Understanding Metering and Metering Modes
If you want your photos to turn out the proper brightness, you need to understand metering!
In photography, it is very important to know about metering, as well as the role of each metering mode. That’s because it helps you control your photo’s exposure – or, in layman’s terms, your photo’s brightness. When I got my first DSLR—a Nikon D80—one of my frustrations was that some images would come out too bright or too dark. I had no idea how to fix it, until one day, when I learned about camera metering modes. Today I’m going to share with you what I know about metering in photography, and how you can use it to take better photos.
فهم أوضاع القياس والقياس
إذا كنت تريد أن تظهر صورك السطوع المناسب، فأنت بحاجة إلى فهم القياس!
في التصوير الفوتوغرافي، من المهم جدًا معرفة القياس، بالإضافة إلى دور كل وضع قياس. وذلك لأنه يساعدك على التحكم في تعرض صورتك – أو، بعبارات عامة، سطوع صورتك. عندما حصلت على أول كاميرا DSLR — Nikon D80 — كان أحد أسباب إحباطي هو أن بعض الصور قد تظهر ساطعة جدًا أو داكنة جدًا. لم يكن لدي أي فكرة عن كيفية إصلاحه، حتى يوم واحد، عندما تعلمت عن أوضاع قياس الكاميرا. سأشارككم اليوم ما أعرفه عن القياس في التصوير الفوتوغرافي، وكيف يمكنك استخدامه لالتقاط صور أفضل.
Table of Contents
- What is Metering?
- Matrix / Evaluative Metering
- Center-Weighted Metering
- Spot Metering
- Highlight Priority
- How to Change Camera Metering Mode
- How to Override Metering
- جدول المحتوياتما هو القياس؟
المصفوفة / القياس التقييمي قياس مركز الوزن
قياس البقعة
أولوية التمييز
كيفية تغيير وضع قياس الكامير
ا كيفية تجاوز القياس - What is Metering?Metering is how your camera evaluates the light of a scene to determine the correct shutter speed, aperture, or ISO. Back in the old days of photography, cameras were not equipped with a light “meter”, which is a sensor that measures the amount and intensity of light. Photographers had to use hand-held light meters to determine the optimal exposure. Obviously, because the work was shot on film, they could not preview or see the results immediately, which is why they religiously relied on those light meters.Today, every digital camera has an integrated light meter that automatically measures the reflected light and determines the optimal exposure. The most common metering modes in digital cameras today are:
- Matrix Metering (Nikon), also known as Evaluative Metering (Canon)
- Center-weighted Metering
- Spot Metering
- Highlight-weighted Metering
 Metering modes are indicated in the viewfinder or LCD by variations on these icons
Some cameras offer more variations on this theme, such as Canon EOS models that have “Partial Metering”, which is similar to Spot Metering, except the covered area is larger (approximately 8% of the viewfinder area near the center vs 3.5% in Spot Metering). Other cameras with subject-recognition modes like Sony cameras often have finely-tuned subject-weighted metering, which calculates the metering based on the subject.You can see the camera meter in action when you shoot in Manual Mode – look inside the viewfinder and you will see bars going left or right, with a zero in the middle, as illustrated below.
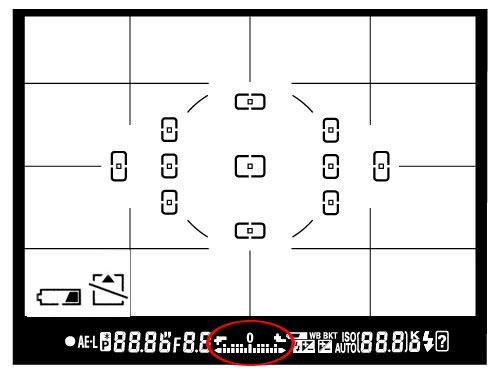
If you point your camera at a very bright area, the bars will go to “+” side, indicating that there is too much light for the current exposure settings. If you point your camera at a very dark area, the bars will go to the “-” side, indicating that there is not enough light. You would then need to increase or decrease your shutter speed to get to “0”, which is the optimal exposure, according to your camera meter.A camera meter is not only useful for just the Manual Mode – when you choose another mode such as Aperture Priority, Shutter Priority or Program Mode, the camera automatically adjusts the settings based on what it reads from the meter.
- ما هو القياس؟القياس هو الطريقة التي تقوم بها الكاميرا بتقييم ضوء المشهد لتحديد سرعة الغالق أو الفتحة أو ISO الصحيحة. في أيام التصوير الفوتوغرافي القديمة، لم تكن الكاميرات مزودة بـ”عداد” الضوء، وهو عبارة عن حساس يقيس كمية الضوء وكثافته. كان على المصورين استخدام أجهزة قياس الضوء المحمولة لتحديد التعريض الضوئي الأمثل. من الواضح أنه نظرًا لأن العمل تم تصويره على فيلم، لم يتمكنوا من معاينة النتائج أو رؤيتها على الفور، ولهذا السبب اعتمدوا دينيًا على مقاييس الضوء تلك.اليوم، تحتوي كل كاميرا رقمية على مقياس ضوء مدمج يقوم تلقائيًا بقياس الضوء المنعكس وتحديد التعرض الأمثل. أوضاع القياس الأكثر شيوعًا في الكاميرات الرقمية اليوم هي:
معايرة المصفوفة (نيكون)، والمعروفة أيضًا باسم القياس التقييمي (Canon)قياس قياس المركزقياس البقعةقياس وزن الضوء
يتم الإشارة إلى أوضاع القياس في عدسة الكاميرا أو شاشة LCD من خلال الاختلافات في هذه الرموزتقدم بعض الكاميرات المزيد من الاختلافات حول هذا الموضوع، مثل طرز Canon EOS التي تحتوي على “قياس جزئي”، وهو مشابه للقياس البقعي، باستثناء أن المنطقة المغطاة أكبر (حوالي 8% من منطقة معين المنظر بالقرب من المركز مقابل 3.5% في Spot القياس). غالبًا ما تحتوي الكاميرات الأخرى ذات أوضاع التعرف على الهدف، مثل كاميرات سوني، على معايرة وزن الموضوع المضبوطة بدقة، والتي تحسب القياس بناءً على الموضوع.
يمكنك رؤية مقياس الكاميرا أثناء العمل عند التصوير في الوضع اليدوي – انظر داخل عدسة الكاميرا وسترى أشرطة متجهة إلى اليسار أو اليمين، مع وجود صفر في المنتصف، كما هو موضح أدناه.
إذا قمت بتوجيه الكاميرا إلى منطقة مشرقة جدًا، فستنتقل الأشرطة إلى الجانب “+”، مما يشير إلى وجود الكثير من الضوء بالنسبة لإعدادات التعرض الحالية. إذا قمت بتوجيه الكاميرا إلى منطقة مظلمة جدًا، فسوف تنتقل الأشرطة إلى الجانب “-“، مما يشير إلى عدم وجود ضوء كافٍ. ستحتاج بعد ذلك إلى زيادة سرعة الغالق أو تقليلها للوصول إلى “0”، وهو التعريض الضوئي الأمثل، وفقًا لمقياس الكاميرا.
لا يعد مقياس الكاميرا مفيدًا فقط للوضع اليدوي – فعندما تختار وضعًا آخر مثل أولوية فتحة العدسة أو أولوية الغالق أو وضع البرنامج، تقوم الكاميرا تلقائيًا بضبط الإعدادات بناءً على ما تقرأه من جهاز القياس.
- Matrix / Evaluative MeteringMatrix Metering or Evaluative Metering mode is the default metering mode on most digital cameras. It works by dividing the entire frame into multiple “zones”, which are then all analyzed on an individual basis for light and dark tones. More advanced Matrix/Evaluative metering systems may try to figure out the scene in front of you using machine learning algorithms and adjust the exposure accordingly.

One of the key factors (in addition to color, distance, subjects, highlights, etc) that affects matrix metering, is where the camera focus point is set to. After reading information from all individual zones, the metering system looks at where you focused within the frame and marks it as more important than all other zones.
You should use this mode for most of your photography since it will generally do a pretty good job of determining the correct exposure. I leave my camera metering mode on matrix metering for most of my photography needs, including landscape and portrait photography.
 Matrix / Evaluative metering is a good starting point where the entire scene’s exposure is important, such as in landscapes. But it’s also the most important metering mode in general – I rarely ever change from Matrix metering.
 - المصفوفة / القياس التقييمييعد وضع قياس المصفوفة أو القياس التقييمي هو وضع القياس الافتراضي في معظم الكاميرات الرقمية. وهو يعمل عن طريق تقسيم الإطار بأكمله إلى “مناطق” متعددة، والتي يتم بعد ذلك تحليلها جميعًا على أساس فردي للحصول على درجات الألوان الفاتحة والداكنة. قد تحاول أنظمة قياس المصفوفة/التقييم الأكثر تقدمًا اكتشاف المشهد أمامك باستخدام خوارزميات التعلم الآلي وضبط التعرض وفقًا لذلك.
أحد العوامل الرئيسية (بالإضافة إلى اللون، والمسافة، والموضوعات، والإبرازات، وما إلى ذلك) التي تؤثر على قياس المصفوفة، هو مكان ضبط نقطة تركيز الكاميرا. بعد قراءة المعلومات من جميع المناطق الفردية، ينظر نظام القياس إلى المكان الذي ركزت عليه داخل الإطار ويصنفه على أنه أكثر أهمية من جميع المناطق الأخرى.
يجب عليك استخدام هذا الوضع في معظم صورك الفوتوغرافية لأنه سيقوم عمومًا بعمل جيد جدًا في تحديد التعريض الضوئي الصحيح. أترك وضع قياس الكاميرا الخاص بي على قياس المصفوفة لمعظم احتياجات التصوير الفوتوغرافي الخاصة بي، بما في ذلك التصوير الفوتوغرافي للمناظر الطبيعية والصور الشخصية.
المصفوفة / القياس التقييمي هو نقطة بداية جيدة حيث يكون تعريض المشهد بأكمله مهمًا، كما هو الحال في المناظر الطبيعية. ولكنه أيضًا وضع القياس الأكثر أهمية بشكل عام – نادرًا ما أغير من قياس المصفوفة.
- Center-Weighted MeteringUsing the whole frame for determining the correct exposure is not always desirable. What if you are trying to take a headshot of a person with the sun behind? This is where center-weighted metering comes in handy. Center-weighted Metering evaluates the light in the middle of the frame and its surroundings and ignores the corners. Compared to Matrix Metering, Center-weighted Metering does not look at the focus point you select and only evaluates the middle area of the image.

Use this mode when you want the camera to prioritize the middle of the frame, which works great for close-up portraits and relatively large subjects that are in the middle of the frame. For example, if you were taking a headshot of a person with the sun behind him/her, then this mode would expose the face of the person correctly, even though everything else would probably get heavily overexposed.
 Center-weighted metering can be more useful for backlit subjects where a bit of overexposure near the strong backlight is expected.
 - قياس مركز المرجحإن استخدام الإطار بأكمله لتحديد التعريض الضوئي الصحيح ليس أمرًا مرغوبًا فيه دائمًا. ماذا لو كنت تحاول التقاط صورة لشخص والشمس خلفه؟ هذا هو المكان الذي يكون فيه قياس وزن المركز مفيدًا. يقوم قياس قياس المنتصف بتقييم الضوء الموجود في منتصف الإطار والمناطق المحيطة به ويتجاهل الزوايا. بالمقارنة مع قياس المصفوفة، فإن قياس قياس المنتصف لا ينظر إلى نقطة التركيز التي تحددها ويقوم فقط بتقييم المنطقة الوسطى من الصورة.
استخدم هذا الوضع عندما تريد من الكاميرا إعطاء الأولوية لمنتصف الإطار، وهو ما يعمل بشكل رائع مع الصور الشخصية المقربة والأهداف الكبيرة نسبيًا الموجودة في منتصف الإطار. على سبيل المثال، إذا كنت تلتقط صورة لرأس شخص ما والشمس خلفه، فإن هذا الوضع سيكشف وجه الشخص بشكل صحيح، على الرغم من أن كل شيء آخر من المحتمل أن يتم تعريضه بشكل مفرط.
يمكن أن يكون القياس المركزي أكثر فائدة للموضوعات ذات الإضاءة الخلفية حيث من المتوقع حدوث القليل من التعريض الضوئي الزائد بالقرب من الإضاءة الخلفية القوية. - Spot MeteringSpot Metering only evaluates the light around your focus point and ignores everything else. It evaluates a single zone/cell and calculates exposure based on that single area, nothing else. I use this mode a lot for my bird photography, because the birds mostly occupy a small area of the frame and I need to make sure that I expose them properly, whether the background is bright or dark.
Because the light is evaluated where I place my focus point, I could get an accurate exposure on the bird even when the bird is in the corner of the frame. Also, if you were taking a picture of a person with the sun behind but they occupied a small part of the frame, it is best to use the spot metering mode instead. When your subjects do not take much of the space, using Matrix or Center-weighted metering modes would most likely result in a silhouette, if the subject was back-lit. Spot metering works great for back-lit subjects like that.

Another good example of using spot metering is when photographing the Moon. Because the moon would take up a small portion of the frame and the sky is completely dark around it, it is best to use Spot metering – that way, we are only looking at the light level coming from the moon and nothing else.In short, spot metering is good when you want the brightness of your specific subject to be a “middle” value. It may result in flawed exposures when you are photographing, say, a bride in a white dress or a groom in a black tuxedo, because it will try to make the white/black subject gray in both cases.
 When you have one obvious subject that you want to be a “medium” brightness, spot metering is a good choice.
 - بقعة القياسيقوم Spot Metering بتقييم الضوء حول نقطة التركيز الخاصة بك فقط ويتجاهل كل شيء آخر. فهو يقيم منطقة/خلية واحدة ويحسب التعرض بناءً على تلك المنطقة الفردية، ولا شيء آخر. أستخدم هذا الوضع كثيرًا في تصوير الطيور، لأن الطيور في الغالب تشغل مساحة صغيرة من الإطار وأحتاج إلى التأكد من تعريضها بشكل صحيح، سواء كانت الخلفية مشرقة أو داكنة.
نظرًا لأنه يتم تقييم الضوء حيث أضع نقطة التركيز، يمكنني الحصول على تعريض ضوئي دقيق للطائر حتى عندما يكون الطائر في زاوية الإطار. وأيضًا، إذا كنت تلتقط صورة لشخص والشمس خلفه ولكنها احتلت جزءًا صغيرًا من الإطار، فمن الأفضل استخدام وضع القياس البقعي بدلاً من ذلك. عندما لا تشغل أهدافك الكثير من المساحة، فإن استخدام أوضاع معايرة المصفوفة أو قياس المنتصف سيؤدي على الأرجح إلى صورة ظلية، إذا كان الهدف مضاءً من الخلف. يعمل القياس الموضعي بشكل رائع مع الموضوعات ذات الإضاءة الخلفية مثل هذا.
مثال جيد آخر لاستخدام القياس الموضعي هو تصوير القمر. نظرًا لأن القمر سيشغل جزءًا صغيرًا من الإطار وتكون السماء مظلمة تمامًا حوله، فمن الأفضل استخدام قياس البقعة – وبهذه الطريقة، ننظر فقط إلى مستوى الضوء القادم من القمر ولا شيء غير ذلك.
باختصار، يعد القياس الموضعي أمرًا جيدًا عندما تريد أن يكون سطوع موضوعك المحدد قيمة “متوسطة”. قد يؤدي ذلك إلى تعريضات ضوئية معيبة عندما تقوم بالتصوير، على سبيل المثال، عروس ترتدي فستانًا أبيض أو عريسًا يرتدي بدلة رسمية سوداء، لأنه سيحاول جعل الهدف الأبيض/الأسود رماديًا في كلتا الحالتين.
عندما يكون لديك هدف واحد واضح وتريد أن يكون سطوعه “متوسطًا”، فإن القياس البقعي يعد خيارًا جيدًا.
- Highlight Priority
Many cameras also have a highlight priority metering mode, which has an indicator icon similar to that of spot metering but with a star beside it.
Highlight priority metering aggressively protects the highlights in your shots. This can be very useful if you have some brighter areas near your subject that you don’t want to overexpose.
On the other hand, highlight priority can be too aggressive in certain scenes as well. If there are bright but unimportant scenes of your shot, or parts you will later crop out, then highlight priority will certainly underexpose the important parts of your composition.
 If there are important highlights in your photo that you don’t want to overexpose, highlight-weighted metering works well.
 - تسليط الضوء على الأولوية
تحتوي العديد من الكاميرات أيضًا على وضع قياس أولوية التمييز، والذي يحتوي على أيقونة مؤشر مشابهة لتلك الخاصة بالقياس الموضعي ولكن مع وجود نجمة بجانبه.
يعمل قياس أولوية التظليل على حماية النقاط البارزة في لقطاتك بقوة. يمكن أن يكون هذا مفيدًا جدًا إذا كان لديك بعض المناطق الأكثر سطوعًا بالقرب من موضوعك والتي لا تريد الإفراط في تعريضها للضوء.
من ناحية أخرى، يمكن أن تكون أولوية التمييز عدوانية جدًا في بعض المشاهد أيضًا. إذا كانت هناك مشاهد ساطعة ولكن غير مهمة في لقطتك، أو أجزاء سوف تقوم باقتصاصها لاحقًا، فمن المؤكد أن أولوية التمييز ستقلل من تعريض الأجزاء المهمة من تكوينك.
إذا كانت هناك نقاط بارزة مهمة في صورتك لا تريد تعريضها للضوء بشكل مفرط، فإن معايرة قياس التظليل تعمل بشكل جيد. - How to Change Camera Metering Mode
Most cameras can change metering modes either through a dedicated button or through the photo shooting menu. On Nikon Z cameras, it can be found in the shooting menu. On Canon R cameras, it involves pressing the “Q” button and selecting the metering icon on screen. Even if your camera does not have a dedicated metering button, you can often assign metering to a custom button.
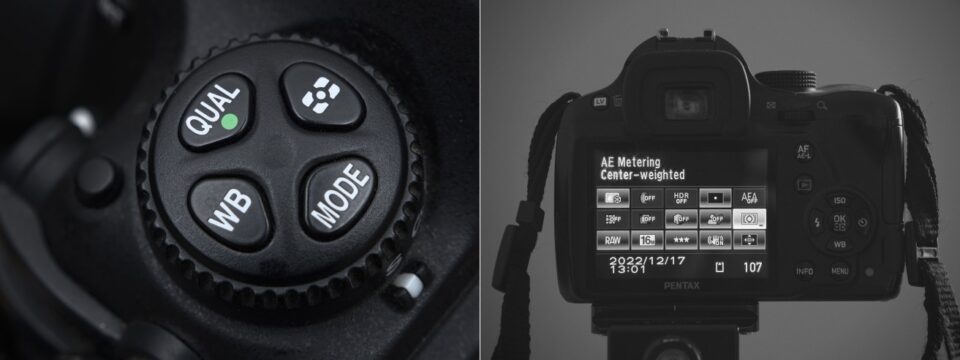 Some cameras have a dedicated button for metering, whereas others have it in a menu
Unfortunately, this varies not only from manufacturer to manufacturer but also from model to model. On the Nikon D5500, for example, it is done through the Info button. On the Nikon D5, there is a separate button on the top left dial whereas on the Z9 it is in the photo shooting menu, but it can be assigned to a button also. - كيفية تغيير وضع قياس الكاميرا
يمكن لمعظم الكاميرات تغيير أوضاع القياس إما من خلال زر مخصص أو من خلال قائمة تصوير الصور. وفي كاميرات Nikon Z، يمكن العثور عليه في قائمة التصوير. في كاميرات Canon R، يتضمن ذلك الضغط على الزر “Q” واختيار رمز القياس على الشاشة. حتى إذا لم تكن الكاميرا الخاصة بك تحتوي على زر قياس مخصص، يمكنك غالبًا تعيين القياس إلى زر مخصص.
تحتوي بعض الكاميرات على زر مخصص للقياس، بينما يوجد زر آخر في القائمة
لسوء الحظ، هذا لا يختلف فقط من مصنع لآخر، ولكن أيضًا من طراز إلى آخر. في كاميرا Nikon D5500، على سبيل المثال، يتم ذلك من خلال زر المعلومات. في كاميرا Nikon D5، يوجد زر منفصل في القرص الأيسر العلوي بينما يوجد في كاميرا Z9 في قائمة التقاط الصور، ولكن يمكن تخصيصه لزر أيضًا.
- How to Override Metering
Camera meters work great when the scene is lit evenly. However, it gets problematic and challenging for light meters to determine the exposure when there are objects with different light levels and intensities. For example, if you are taking a picture of the blue sky with no clouds or sun in the frame, the image will be correctly exposed, because there is just one light level to deal with. The job gets a little harder if you add a few clouds into the image – the meter now needs to evaluate the brightness of the clouds versus the brightness of the sky and try to determine the optimal exposure. As a result, the camera meter might get confused.
In short, selecting the right metering mode allows you to quickly get close to the exposure you’re after. Nonetheless, you might find that the metering is not quite right, especially after reviewing your shots, or after looking at the in-camera histogram or zebras.
In this case, all cameras have a function called exposure compensation. Accessing it is typically a matter of pressing a button that looks like a ± sign or turning a dial. Many cameras in aperture or shutter priority mode allow you to directly change the exposure compensation by directly turning a dial.
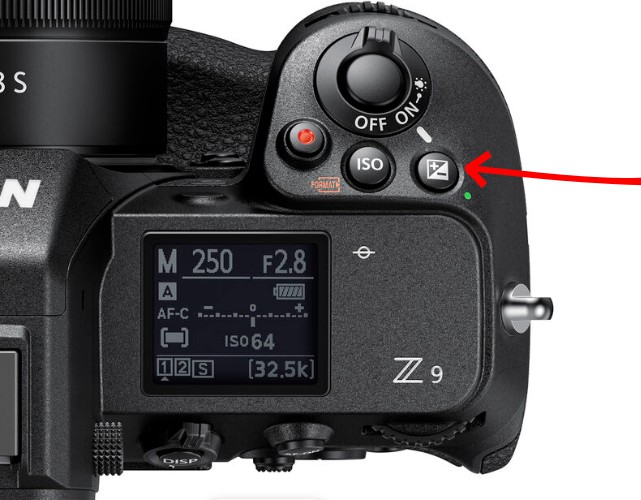 Exposure compensation adjusts the initial calculated exposure from the metering mode, and it can be changed by pressing the ± button on most cameras such as on this Nikon Z9
Thus, if the metering is overexposing too much for your taste, you can turn the exposure compensation down. Likewise, if the scene appears too dark, you can turn it up. In other words, you should think of the metering mode as a good starting point, and the exposure compensation as the fine-tuning to get closer to the result that you want. - كيفية تجاوز القياس
تعمل عدادات الكاميرا بشكل رائع عندما يكون المشهد مضاءً بشكل متساوٍ. ومع ذلك، يصبح الأمر صعبًا وصعبًا بالنسبة لأجهزة قياس الضوء لتحديد التعريض الضوئي عندما تكون هناك أجسام ذات مستويات وشدة إضاءة مختلفة. على سبيل المثال، إذا كنت تلتقط صورة للسماء الزرقاء دون وجود غيوم أو شمس في الإطار، فسيتم تعريض الصورة بشكل صحيح، لأنه يوجد مستوى ضوء واحد فقط للتعامل معه. تصبح المهمة أكثر صعوبة قليلاً إذا أضفت بعض السحب إلى الصورة – يحتاج المقياس الآن إلى تقييم سطوع السحب مقابل سطوع السماء ومحاولة تحديد التعريض الضوئي الأمثل. ونتيجة لذلك، قد يتشوش مقياس الكاميرا.
باختصار، يتيح لك تحديد وضع القياس المناسب الاقتراب بسرعة من التعريض الضوئي الذي تبحث عنه. ومع ذلك، قد تجد أن القياس ليس صحيحًا تمامًا، خاصة بعد مراجعة اللقطات، أو بعد النظر إلى الرسم البياني داخل الكاميرا أو الحمير الوحشية.
في هذه الحالة، تحتوي جميع الكاميرات على وظيفة تسمى تعويض التعريض الضوئي. عادةً ما يكون الوصول إليه عن طريق الضغط على زر يشبه علامة ± أو تدوير القرص. تسمح لك العديد من الكاميرات في وضع أولوية الفتحة أو الغالق بتغيير تعويض التعريض الضوئي مباشرةً عن طريق تدوير القرص مباشرةً.
يعمل تعويض التعريض على ضبط التعريض المحسوب الأولي من وضع القياس، ويمكن تغييره عن طريق الضغط على الزر ± في معظم الكاميرات مثل كاميرا Nikon Z9 هذهوبالتالي، إذا كان القياس يفرط في التعريض الضوئي أكثر من اللازم بالنسبة لذوقك، فيمكنك خفض تعويض التعريض الضوئي. وبالمثل، إذا بدا المشهد مظلمًا جدًا، فيمكنك رفعه. بمعنى آخر، يجب أن تفكر في وضع القياس كنقطة بداية جيدة، وتعويض التعريض الضوئي باعتباره الضبط الدقيق للاقتراب من النتيجة التي تريدها.

