Understanding Aperture in Photography
فهم الفتحة في التصوير الفوتوغرافي
الملفات المرفقة
- Aperture is one of the three pillars of photography (the other two being Shutter Speed and ISO. Of the three, aperture is certainly the most important. In this article, we go through everything you need to know about aperture and how it works.
 An image captured with a wide aperture of f/1.8 isolates the subject
 - تعد فتحة العدسة إحدى الركائز الثلاث للتصوير الفوتوغرافي (الركائز الأخرى هي سرعة الغالق وISO . من بين الثلاثة، الفتحة هي بالتأكيد الأكثر أهمية. في هذه المقالة، سنتعرف على كل ما تحتاج لمعرفته حول فتحة العدسة وكيفية عملها.
الصورة الملتقطة بفتحة واسعة تبلغ f/1.8 تعزل الهدف - Table of Contents
- What is Aperture?
- Aperture Explained in Video
- How Aperture Affects Exposure
- How Aperture Affects Depth of Field
- What Are F-Stop and F-Number?
- Large vs Small Aperture
- How to Pick the Right Aperture
- Setting Aperture in Your Camera
- Minimum and Maximum Aperture of Lenses
- Examples of Which Aperture to Use
- Everything Aperture Does to Your Photos
- Aperture FAQ
- Summary
- جدول المحتوياتما هي فتحة العدسة؟
- فتحة العدسة الموضحة بالفيديو
- كيف تؤثر فتحة العدسة على التعريض الضوئي
- كيف تؤثر فتحة العدسة على عمق المجال
- ما هي F-Stop وF-Number؟
- فتحة عدسة كبيرة مقابل فتحة عدسة صغيرة
- كيفية اختيار فتحة العدسة المناسبة
- ضبط الفتحة في الكاميراالفتحة الدنيا والقصوى للعدسات
- أمثلة على الفتحة التي تستخدمها كل فتحة العدسة على صورك
- التأثير السلبي للحيود
- انحرافات العدسة
- تأثيرات الانفجار النجمي ونجمة الشمس
- فتحة عدسة صغيرة وعناصر غير مرغوب فيها
- تغييرات على البوكيه
- مشكلات تحويل التركيز
- سهولة التركيز
- التعرض للفلاش
- الأسئلة الشائعة
- حول الفتحة ملخص
- What is Aperture?Aperture can be defined as the opening in a lens through which light passes to enter the camera. It is an easy concept to understand if you just think about how your eyes work. As you move between bright and dark environments, the iris in your eyes either expands or shrinks, controlling the size of your pupil.In photography, the “pupil” of your lens is called aperture. You can shrink or enlarge the size of the aperture to allow more or less light to reach your camera sensor. The image below shows an aperture in a lens:
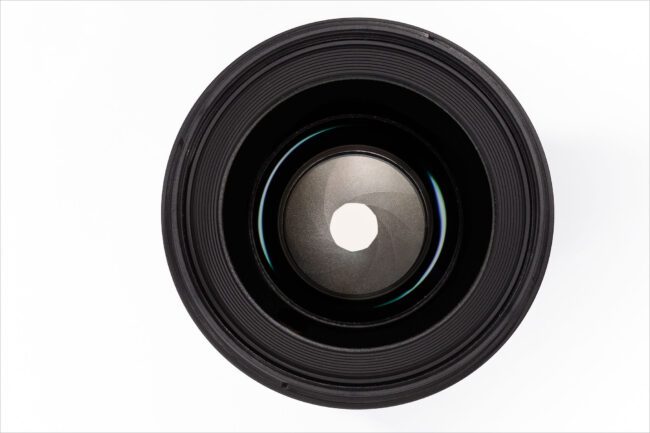 Aperture is like the “pupil” for your camera system, which can open and close to change the amount of light that passes through. Note the nine blades in this lens, which form a diaphragm to block any light that tries to pass, except through the center.
 - ما هي الفتحة؟يمكن تعريف فتحة العدسة بأنها فتحة في العدسة يمر من خلالها الضوء ليدخل إلى الكاميرا. إنه مفهوم سهل الفهم إذا فكرت فقط في كيفية عمل عينيك. أثناء تنقلك بين البيئات المضيئة والمظلمة، تتوسع القزحية في عينيك أو تتقلص، مما يتحكم في حجم حدقة العين.في التصوير الفوتوغرافي، تسمى “بؤبؤة” العدسة بالفتحة. يمكنك تقليص حجم الفتحة أو تكبيرها للسماح بوصول قدر أكبر أو أقل من الضوء إلى مستشعر الكاميرا. الصورة أدناه توضح فتحة في العدسة:
تشبه فتحة العدسة “البؤبؤة” لنظام الكاميرا، والتي يمكن فتحها وإغلاقها لتغيير كمية الضوء التي تمر عبرها. لاحظ الشفرات التسعة في هذه العدسة، والتي تشكل حاجزًا لمنع أي ضوء يحاول المرور، باستثناء المركز. - Aperture can add dimension to your photos by controlling depth of field. At one extreme, aperture gives you a blurred background with a beautiful shallow focus effect. This is very popular for portrait photography.At the other extreme, it will give you sharp photos from the nearby foreground to the distant horizon. Landscape photographers use this effect a lot.On top of that, the aperture you choose also alters the exposure of your images by making them brighter or darker.
-
يمكن أن تضيف فتحة العدسة بُعدًا إلى صورك من خلال التحكم في عمق المجال. من ناحية، تمنحك فتحة العدسة خلفية غير واضحة مع تأثير تركيز بؤري سطحي جميل. هذا يحظى بشعبية كبيرة في التصوير الفوتوغرافي للصور الشخصية.
وعلى الجانب الآخر، سيمنحك صورًا واضحة من المقدمة القريبة إلى الأفق البعيد. يستخدم مصورو المناظر الطبيعية هذا التأثير كثيرًا.
علاوة على ذلك، تعمل الفتحة التي تختارها أيضًا على تغيير تعرض صورك بجعلها أكثر سطوعًا أو أغمق.
Aperture Explained in Video
If you prefer to understand how aperture works visually, we put together a video for you that goes through most of the basics. In the video, we go through what aperture is, how it works, and every effect that aperture has in photography. (These points are also covered further down in this article.)
************************ -


( رابط الفديو بالتعليق ونعتذر لعدم توفره باللغة العربية)
How Aperture Affects Exposure
Aperture has several effects on your photographs. Perhaps the most obvious is the brightness, or exposure, of your images. As aperture changes in size, it alters the overall amount of light that reaches your camera sensor – and therefore the brightness of your image.
A large aperture (a wide opening) will pass a lot of light, resulting in a brighter photograph. A small aperture does just the opposite, making a photo darker. Take a look at the illustration below to see how it affects exposure:
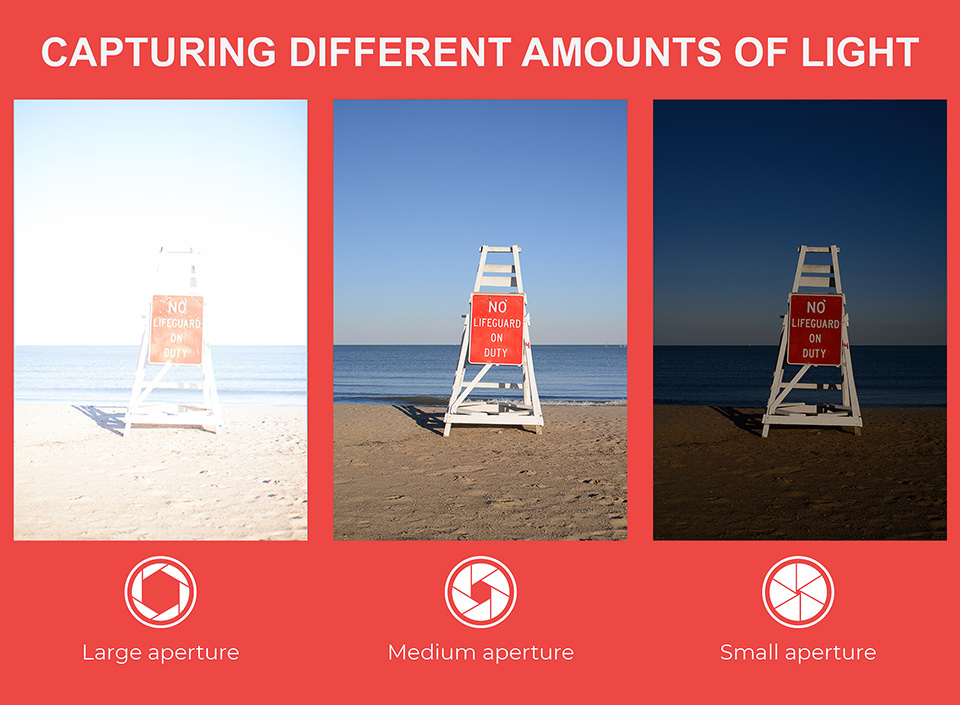
In a dark environment – such as indoors or at night – you will probably want to select a large aperture to capture as much light as possible. This is the same reason why people’s pupils dilate when it starts to get dark; pupils are the aperture of our eyes.
كيف تؤثر الفتحة على التعرض
الفتحة لها العديد من التأثيرات على صورك الفوتوغرافية. ربما يكون الأمر الأكثر وضوحًا هو سطوع صورك أو تعرضها للضوء. مع تغير حجم الفتحة، فإنها تغير الكمية الإجمالية للضوء التي تصل إلى مستشعر الكاميرا – وبالتالي سطوع الصورة.
سوف تمر فتحة كبيرة (فتحة واسعة) بكمية كبيرة من الضوء، مما يؤدي إلى الحصول على صورة أكثر سطوعًا. فتحة صغيرة تفعل العكس تمامًا، مما يجعل الصورة أكثر قتامة. ألقِ نظرة على الرسم التوضيحي أدناه لمعرفة مدى تأثيره على التعرض:
في بيئة مظلمة – مثل الداخل أو في الليل – قد ترغب على الأرجح في تحديد فتحة كبيرة لالتقاط أكبر قدر ممكن من الضوء. وهذا هو نفس السبب وراء اتساع حدقة العين عند حلول الظلام؛ التلاميذ هم فتحة أعيننا.
How Aperture Affects Depth of Field
The other critical effect of aperture is depth of field. Depth of field is the amount of your photograph that appears sharp from front to back. Some images have a “thin” or “shallow” depth of field, where the background is completely out of focus. Other images have a “large” or “high” depth of field, where both the foreground and background are sharp.
For example, here is an image with a shallow depth of field:
 This photograph has a thin depth of field – a “shallow focus” effect.
كيف تؤثر الفتحة على عمق المجال
التأثير الحاسم الآخر للفتحة هو عمق المجال. عمق المجال هو مقدار الصورة التي تظهر بوضوح من الأمام إلى الخلف. تحتوي بعض الصور على عمق مجال “رفيع” أو “ضحل”، حيث تكون الخلفية خارج نطاق التركيز تمامًا. تحتوي الصور الأخرى على عمق مجال “كبير” أو “عالي”، حيث تكون المقدمة والخلفية حادة.
على سبيل المثال، إليك صورة بعمق مجال ضحل:

تحتوي هذه الصورة على عمق مجال رفيع – تأثير “التركيز الضحل”.
In the image above, you can see that the girl is in focus and appears sharp, while the background is completely out of focus. My choice of aperture played a big role here. I specifically used a large aperture in order to create a shallow focus effect (yes, the larger your aperture, the bigger this effect). This helped me bring the attention of the viewer to the subject, rather than busy background. Had I used a narrower aperture, the subject would not be separated from the background as effectively.One trick to remember this relationship: a large aperture results in a large amount of both foreground and background blur. This is often desirable for portraits, or general photos of objects where you want to isolate the subject. Sometimes you can frame your subject with foreground objects, which will also look blurred relative to the subject, as shown in the example below:
هناك خدعة واحدة لتذكر هذه العلاقة: تؤدي الفتحة الكبيرة إلى قدر كبير من ضبابية المقدمة والخلفية. غالبًا ما يكون هذا أمرًا مرغوبًا فيه للصور الشخصية أو الصور العامة للأشياء التي تريد عزل الموضوع فيها. في بعض الأحيان، يمكنك تأطير موضوعك باستخدام كائنات في المقدمة، والتي ستبدو أيضًا غير واضحة بالنسبة للموضوع، كما هو موضح في المثال أدناه:
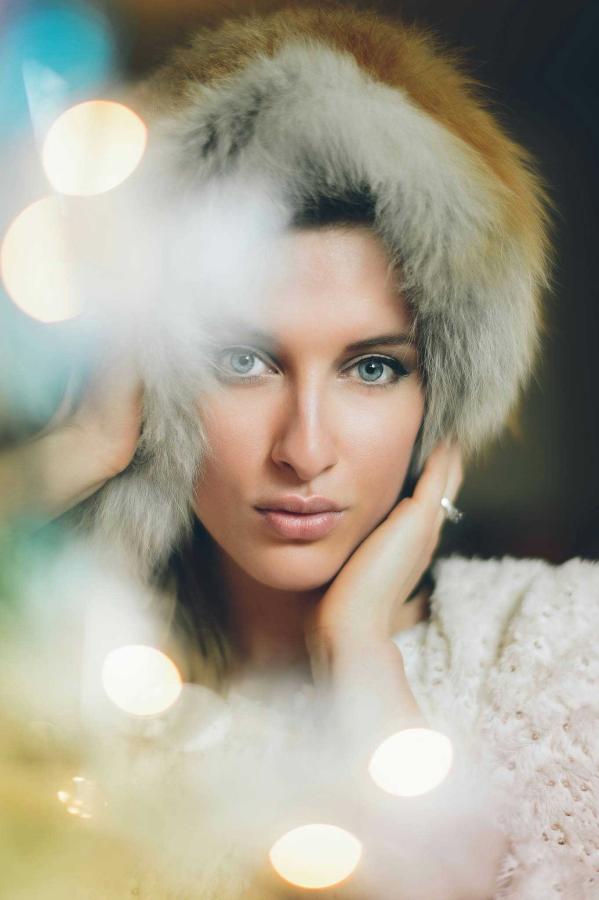
تم التقاطها بعدسة بورتريه باستخدام فتحة كبيرة جدًا تبلغ f/1.4
الملفات المرفقة
تم التقاطها باستخدام فتحة صغيرة جدًا تبلغ f/16 لإزالة ضبابية الخلفية وتحقيق عمق مجال كافٍ
As you can see, in the photograph on the left, only the head of the lizard appears in focus and sharp, while the background and foreground are both transitioning into blur. Meanwhile, the photo on the right has everything from front to back appearing in focus. This is what using large vs small aperture does to photographs.
كما ترون، في الصورة على اليسار، يظهر رأس السحلية فقط في التركيز والوضوح، بينما تتحول الخلفية والمقدمة إلى ضبابية. وفي الوقت نفسه، تظهر الصورة الموجودة على اليمين كل شيء من الأمام إلى الخلف ضمن نطاق التركيز. هذا ما يفعله استخدام الفتحة الكبيرة مقابل الفتحة الصغيرة في الصور الفوتوغرافية.
What Are F-Stop and F-Number?
So far, we have only discussed aperture in general terms like large and small. However, it can also be expressed as a number known as “f-number” or “f-stop”, with the letter “f” appearing before the number, such as f/8.
Most likely, you have noticed aperture written this way on your camera before. On your LCD screen or viewfinder, your aperture will usually look something like this: f/2, f/3.5, f/8, and so on. Some cameras omit the slash and write f-stops like this: f2, f3.5, f8, and so on. For example, the Nikon camera below is set to an aperture of f/8:
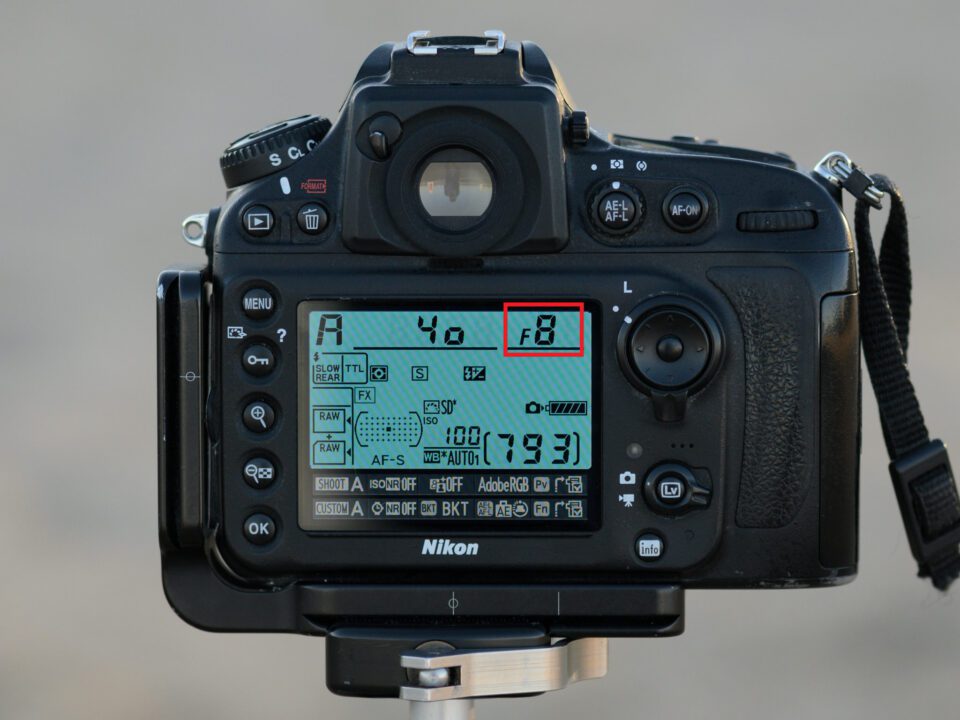 Aperture is labeled in f-numbers, and in this case, I’m using f/8.
So, f-stops are a way of describing the size of the aperture for a particular photo.
ما هو F-Stop وF-Number؟
حتى الآن، ناقشنا الفتحة فقط بعبارات عامة مثل الكبيرة والصغيرة. ومع ذلك، يمكن أيضًا التعبير عنه برقم يُعرف باسم “f-number” أو “f-stop”، مع ظهور الحرف “f” قبل الرقم، مثل f/8.
على الأرجح أنك لاحظت أن فتحة العدسة مكتوبة بهذه الطريقة على الكاميرا من قبل. على شاشة LCD أو عدسة الكاميرا، ستبدو فتحة العدسة عادةً على النحو التالي: f/2، f/3.5، f/8، وما إلى ذلك. بعض الكاميرات تحذف الشرطة المائلة وتكتب f-stop مثل هذا: f2، f3.5، f8، وهكذا. على سبيل المثال، تم ضبط كاميرا Nikon أدناه على فتحة f/8:
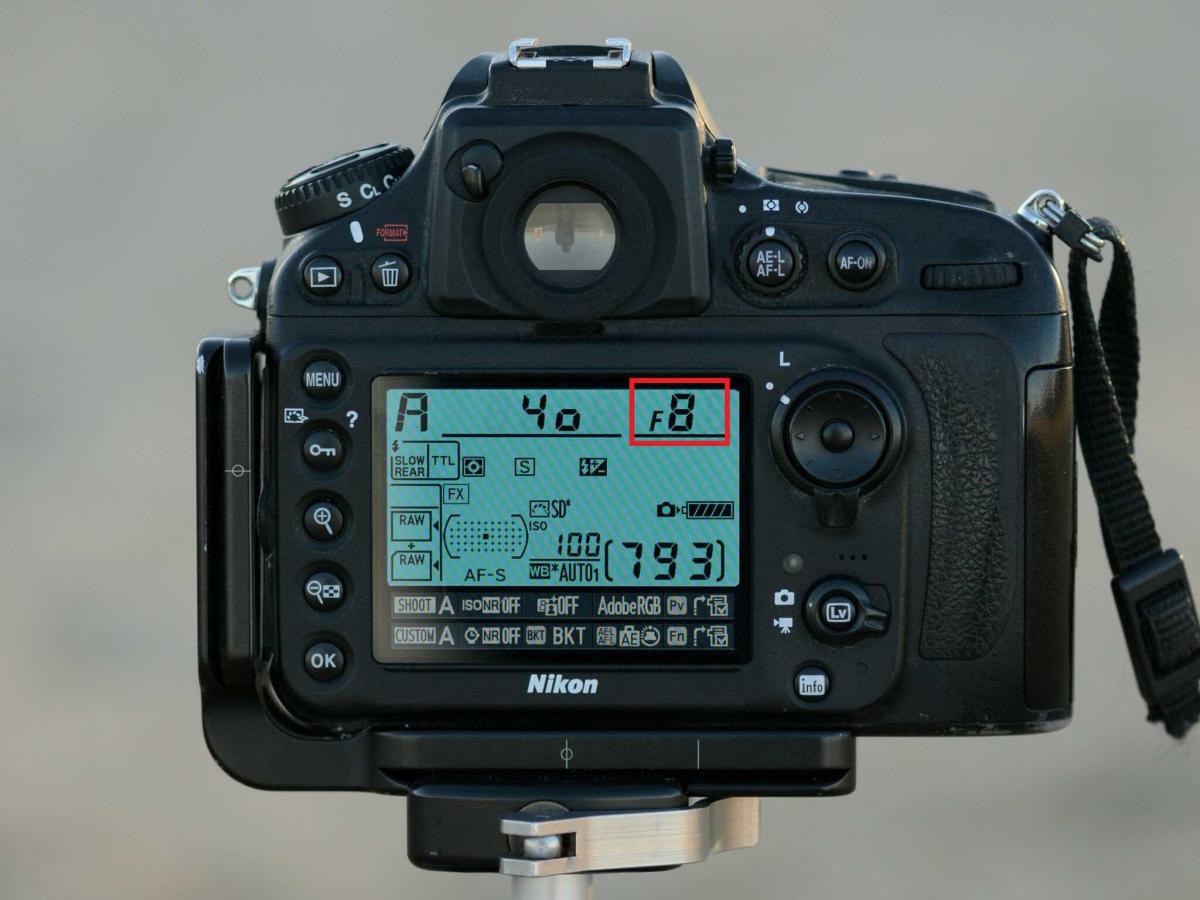
يتم تصنيف فتحة العدسة بالأرقام البؤرية، وفي هذه الحالة، أستخدم f/8.
لذلك، فإن f-stop هي طريقة لوصف حجم فتحة العدسة في صورة معينة
Minimum and Maximum Aperture of Lenses
Every lens has a limit on how large or how small the aperture can get. If you take a look at the specifications of your lens, it should say what the maximum and minimum apertures are. For almost everyone, the maximum aperture will be more important, because it tells you how much light the lens can gather at its maximum (basically, how dark of an environment you can take photos – and how much of a shallow focus effect you can achieve).
A lens that has a maximum aperture of f/1.4 or f/1.8 is considered to be a “fast” lens, because it can pass through more light than, for example, a lens with a “slow” maximum aperture of f/4.0. That’s why lenses with large apertures usually cost more.
By comparison, the minimum aperture is not that important, because almost all modern lenses can provide at least f/16 at the minimum. You will rarely need anything smaller than that for day-to-day photography.
With some zoom lenses, the maximum aperture will change as you zoom in and out. For example, with the Nikon 18-55mm f/3.5-5.6 AF-P lens, the largest aperture shifts gradually from f/3.5 at the wide end to just f/5.6 at the longer focal lengths. More expensive zooms tend to maintain a constant maximum aperture throughout their zoom range, like the Nikon 24-70mm f/2.8. Prime lenses also tend to have larger maximum apertures than zoom lenses, which is one of their major benefits.
The maximum aperture of a lens is so important that it’s included in the name of the lens itself. Sometimes, it will be written with a colon rather than a slash, but it means the same thing (like the Nikon 50mm 1:1.4G below).
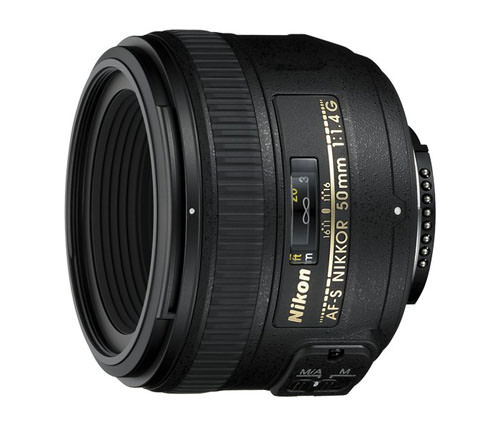 الحد الأدنى والحد الأقصى لفتحة العدسات
كل عدسة لها حد معين لمدى كبر أو صغر فتحة العدسة. إذا ألقيت نظرة على مواصفات العدسة الخاصة بك، فيجب أن تحدد الحد الأقصى والحد الأدنى للفتحات. بالنسبة للجميع تقريبًا، ستكون الفتحة القصوى أكثر أهمية، لأنها تخبرك بمقدار الضوء الذي يمكن للعدسة جمعه عند الحد الأقصى (أساسًا، مدى ظلمة البيئة التي يمكنك التقاط الصور بها – ومقدار تأثير التركيز البؤري الضحل الذي يمكنك تحقيقه ).
تعتبر العدسة التي تحتوي على فتحة قصوى تبلغ f/1.4 أو f/1.8 عدسة “سريعة”، لأنها يمكن أن تمر عبر ضوء أكثر من، على سبيل المثال، عدسة ذات فتحة قصوى “بطيئة” تبلغ f/4.0. . ولهذا السبب عادةً ما تكون تكلفة العدسات ذات الفتحات الكبيرة أعلى.
وبالمقارنة، فإن الحد الأدنى للفتحة ليس بهذه الأهمية، لأن جميع العدسات الحديثة تقريبًا يمكن أن توفر فتحة f/16 على الأقل كحد أدنى. نادرًا ما تحتاج إلى أي شيء أصغر من ذلك للتصوير الفوتوغرافي اليومي.
مع بعض عدسات التكبير/التصغير، يتغير الحد الأقصى للفتحة أثناء التكبير والتصغير. على سبيل المثال، مع عدسة Nikon مقاس 18-55 مم f/3.5-5.6 AF-P، تتغير الفتحة الأكبر تدريجيًا من f/3.5 عند الطرف العريض إلى f/5.6 فقط عند الأطوال البؤرية الأطول. تميل أدوات التكبير/التصغير الأكثر تكلفة إلى الحفاظ على الحد الأقصى للفتحة الثابتة عبر نطاق التكبير/التصغير، مثل عدسة Nikon مقاس 24-70 مم وبفتحة f/2.8. تميل العدسات الأولية أيضًا إلى أن تحتوي على فتحات قصوى أكبر من عدسات التكبير/التصغير، وهي إحدى فوائدها الرئيسية.
تعد الفتحة القصوى للعدسة مهمة جدًا بحيث يتم تضمينها في اسم العدسة نفسها. في بعض الأحيان، سيتم كتابته بنقطتين بدلاً من شرطة مائلة، ولكنه يعني نفس الشيء (مثل Nikon 50mm 1:1.4G أدناه).
Examples of Which Aperture to Use
Now that we have gone through a thorough explanation of how aperture works and how it affects your images, let’s take a look at the situations where you’d want to use various f-stops.
You’ve made it this far, but are you willing to learn more about aperture? So far we have only touched the basics, but aperture does so much more to your photographs. Let’s take a closer look.
أمثلة على الفتحة التي يجب استخدامها
الآن بعد أن تناولنا شرحًا شاملاً لكيفية عمل فتحة العدسة وكيفية تأثيرها على صورك، دعنا نلقي نظرة على المواقف التي تريد فيها استخدام نقاط توقف مختلفة.
f/0.95 – f/1.4 – تتوفر هذه الفتحات القصوى “السريعة” فقط في العدسات الأولية المتميزة، مما يسمح لها بجمع أكبر قدر ممكن من الضوء. وهذا يجعلها مثالية لأي نوع من التصوير الفوتوغرافي في الإضاءة المنخفضة (مثل تصوير السماء ليلاً، وحفلات الزفاف، والصور الشخصية في الغرف ذات الإضاءة الخافتة، وأحداث الشركات، وما إلى ذلك). مع هذه التوقفات الواسعة، ستحصل على عمق مجال ضحل جدًا على مسافات قريبة، حيث سيظهر الهدف منفصلاً عن الخلفية. f/1.8 – f/2.0 – تقتصر بعض العدسات الأولية المخصصة للمتحمسين على f/1.8، والتي لا تزال تتمتع بقدرات جيدة جدًا في الإضاءة المنخفضة. وأيضًا، إذا كان هدفك هو إنتاج صور مبهجة من الناحية الجمالية مع تركيز سطحي، فإن هذه العدسات تكون ذات قيمة هائلة. يؤدي التصوير بين f/1.8 وf/2 عادةً إلى تحويل خلفياتك إلى جميلة وكريمية للصور الشخصية وأنواع أخرى مماثلة من التصوير الفوتوغرافي. f/2.8 – f/4 – تقتصر معظم عدسات التكبير/التصغير على فتحة قصوى تتراوح من f/2.8 إلى f/4 في أحسن الأحوال. على الرغم من أنها ليست بنفس قدرة العدسات f/1.4 من حيث قدرات جمع الضوء، إلا أنها لا تزال كافية للتصوير في ظروف الإضاءة المنخفضة بشكل معقول، خاصة إذا كانت العدسة أو الكاميرا مزودة بتثبيت الصورة. ستحصل على بعض الفصل بين الهدف عند هذه الفتحات، ولكن عادةً لا يكون ذلك كافيًا لجعل الخلفية غامضة تمامًا. تعتبر هذه الفتحات رائعة لتصوير السفر والرياضة والحياة البرية.f/5.6 – f/8 – هذه هي نقطة البداية الصحيحة لمعظم تصوير المناظر الطبيعية والمعمارية. كما أنه مثالي للتصوير الفوتوغرافي الوثائقي والصور الشخصية حيث لا تريد خلفية ضبابية. أيضًا، تكون معظم العدسات أكثر وضوحًا عند f/5.6، وهو أمر لا يهم بقدر الحصول على عمق المجال الصحيح، ولكنه لا يزال رائعًا. f/11 – f/16 – يُستخدم عادةً لتصوير المشاهد التي يكون فيها عمق المجال كبيرًا قدر الإمكان، مثل تصوير الماكرو أو تصوير المناظر الطبيعية مع مقدمة قريبة. على الرغم من أن هذه الفتحات توفر عمقًا أكبر للمجال، إلا أنها تفقد بعض الحدة منخفضة المستوى بسبب تأثير حيود العدسة.f/22 والأصغر – لا تلتقط هذه الفتحات الصغيرة إلا إذا كنت تعرف ما تفعله. تتأثر الحدة بشكل كبير عند استخدام f/22 وفتحات أصغر بسبب الحيود، لذا يجب عليك تجنب استخدامها عندما يكون ذلك ممكنًا. إذا كنت تريد الحصول على عمق أكبر للمجال، فمن الأفضل عادةً الابتعاد عن الهدف أو استخدام تقنية تكديس التركيز البؤري بدلاً من ذلك.
لقد وصلت إلى هذا الحد، ولكن هل أنت على استعداد لمعرفة المزيد عن فتحة العدسة؟ لقد تطرقنا حتى الآن إلى الأساسيات فقط، لكن فتحة العدسة تفعل الكثير في صورك الفوتوغرافية. دعونا نلقي نظرة فاحصة.
Everything Aperture Does to Your Photos
Ever wondered how else aperture affects your photographs aside from brightness and depth of field? In this part of the article, we will go through all other ways aperture impacts your images, from sharpness to sunstars, and tell you exactly why each matters.
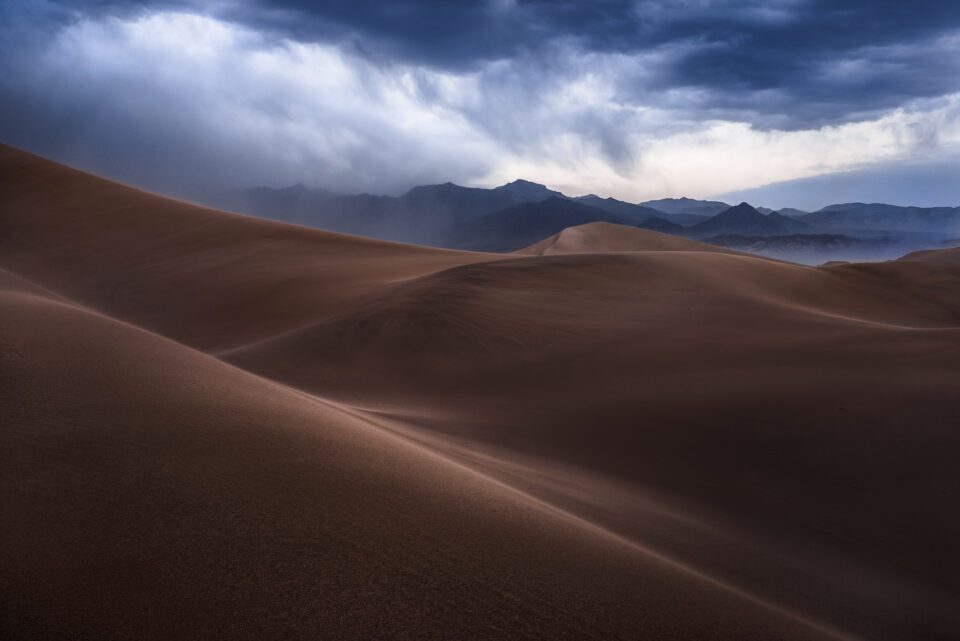 A landscape image captured at f/16 to bring everything from foreground to background into focus. Diffraction can be a problem at such small apertures, as explained below.
Before diving into too many specifics, here’s a quick list of everything aperture affects in photography:
صورة أفقية تم التقاطها بفتحة f/16 لتسليط الضوء على كل شيء من المقدمة إلى الخلفية. يمكن أن يشكل الحيود مشكلة عند هذه الفتحات الصغيرة، كما هو موضح أدناه.
قبل التعمق في الكثير من التفاصيل، إليك قائمة سريعة بكل ما تؤثر عليه فتحة العدسة في التصوير الفوتوغرافي:
سطوع / تعرض صورك وعمق المجال، كما تمت مناقشته حتى الآن، فقدان الحدة بسبب الحيود، فقدان الحدة بسبب جودة العدسة، تأثيرات الانفجار النجمي على الأضواء الساطعة، رؤية بقع الغبار بمستشعر الكاميرا، جودة الإضاءة الخلفية (بوكيه) تحويل التركيز البؤري على بعض العدسات، القدرة على التركيز في الأماكن المنخفضة الضوء (في بعض الظروف)التحكم في كمية الضوء الصادرة من الفلاش
No!
If we go back and take a close look at the photo of the lizard from earlier in this article, where I used apertures of f/4 and f/32, you can see how diffraction is making the second shot less sharp. Here are the images when zoomed in to 100% view:
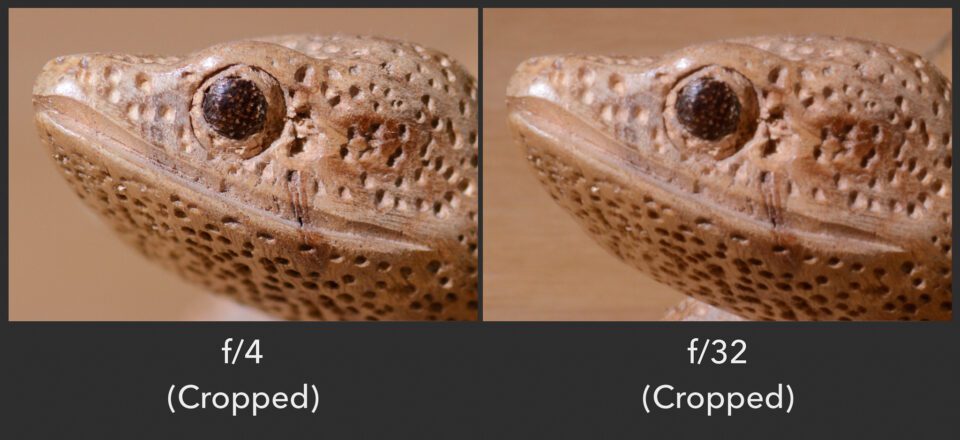 The photo at f/32 loses low-level sharpness even though it has more depth of field
Here, you’re seeing an effect called diffraction. Physics majors will know what I’m talking about, but diffraction is a foreign concept to most people. So, what is it?
Diffraction is actually quite simple. When you use a tiny aperture like f/32, you literally squeeze the light that passes through your lens. It ends up interfering with itself, growing blurrier, and resulting in photos that are noticeably less sharp.
At what aperture does diffraction start to become an issue? It depends upon a number of factors, including the size of your camera sensor and the size of your final print. Personally, on my full-frame camera, I see hints of diffraction at f/8, but it’s not enough to bother me. I actually use even smaller apertures like f/11 and f/16 all the time when I have a close foreground in landscape photography. However, I try to avoid f/22 or smaller, since I lose too much detail at that point.
Diffraction isn’t necessarily a huge problem, but it exists. Don’t be afraid to take pictures at f/11 or f/16 just because you lose a little bit of sharpness. In many cases, the added depth of field is worth the tradeoff.
In macro photography, diffraction can be a bit more of a problem close-focusing actually makes your effective aperture a lot smaller than it really is. Although the math behind that gets a bit complicated, basically, shooting at f/11 at macro distances will show diffraction a lot more compared to if you’re shooting a landscape at f/11. In other words, keep an eye out for diffraction when shooting macro.
1. التأثير السلبي للحيود
لذا، إذا كنت مصورًا للمناظر الطبيعية وتريد أن يكون كل شيء واضحًا قدر الإمكان، فيجب عليك استخدام أصغر فتحة للعدسة، مثل f/22 أو f/32 للحصول على أقصى عمق للمجال، أليس كذلك؟
لا!
إذا عدنا وألقينا نظرة فاحصة على صورة السحلية من وقت سابق في هذه المقالة، حيث استخدمت فتحات f/4 وf/32، يمكنك أن ترى كيف يجعل الحيود اللقطة الثانية أقل حدة. وهذه هي الصور بعد تكبيرها بنسبة 100%:
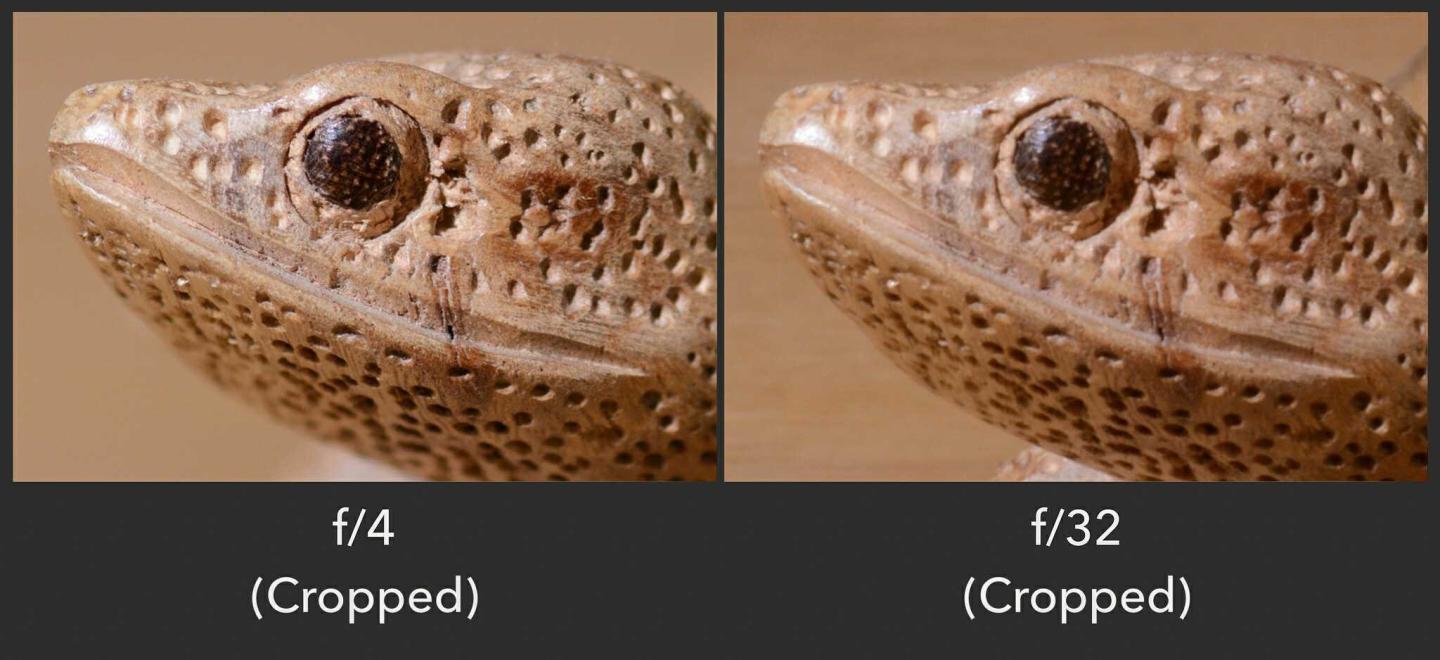
تفقد الصورة عند f/32 مستوى الوضوح المنخفض على الرغم من أنها تحتوي على عمق مجال أكبر
هنا، ترى تأثيرًا يسمى الحيود. سيعرف طلاب الفيزياء ما أتحدث عنه، لكن الحيود مفهوم غريب بالنسبة لمعظم الناس. إذا ما هو؟
الحيود هو في الواقع بسيط للغاية. عند استخدام فتحة صغيرة مثل f/32، فإنك تضغط حرفيًا على الضوء الذي يمر عبر عدستك. وينتهي الأمر بالتداخل مع نفسه، مما يؤدي إلى زيادة الضبابية، وينتج عنه صور أقل وضوحًا بشكل ملحوظ.
في أي فتحة يبدأ الحيود في أن يصبح مشكلة؟ يعتمد ذلك على عدد من العوامل، بما في ذلك حجم مستشعر الكاميرا وحجم الطباعة النهائية. شخصيًا، في كاميرتي ذات الإطار الكامل، أرى تلميحات عن الحيود عند f/8، لكن هذا ليس كافيًا لإزعاجي. أنا في الواقع أستخدم فتحات أصغر مثل f/11 وf/16 طوال الوقت عندما يكون لدي مقدمة قريبة في تصوير المناظر الطبيعية. ومع ذلك، أحاول تجنب f/22 أو أصغر، لأنني أفقد الكثير من التفاصيل في تلك المرحلة.
الحيود ليس بالضرورة مشكلة كبيرة، لكنه موجود. لا تخف من التقاط الصور بفتحة f/11 أو f/16 لمجرد أنك تفقد القليل من الحدة. في كثير من الحالات، يستحق عمق المجال الإضافي المقايضة.
في التصوير الفوتوغرافي الماكرو، يمكن أن يكون الحيود مشكلة أكبر قليلاً، فالتركيز القريب يجعل في الواقع فتحة العدسة الفعالة أصغر بكثير مما هي عليه بالفعل. على الرغم من أن العمليات الحسابية وراء ذلك تصبح معقدة بعض الشيء، إلا أن التصوير بفتحة f/11 على مسافات كبيرة سيُظهر حيودًا أكبر بكثير مقارنة بما إذا كنت تصور منظرًا طبيعيًا بفتحة f/11. بمعنى آخر، انتبه إلى الحيود عند التصوير عن قرب.
Here’s a fun one. For some reason, everyone wants to take sharp photos! One of the ways to do so is to minimize the visibility of lens aberrations. So, what are lens aberrations? Quite simply, they are image quality problems with a photo, caused by your lens.
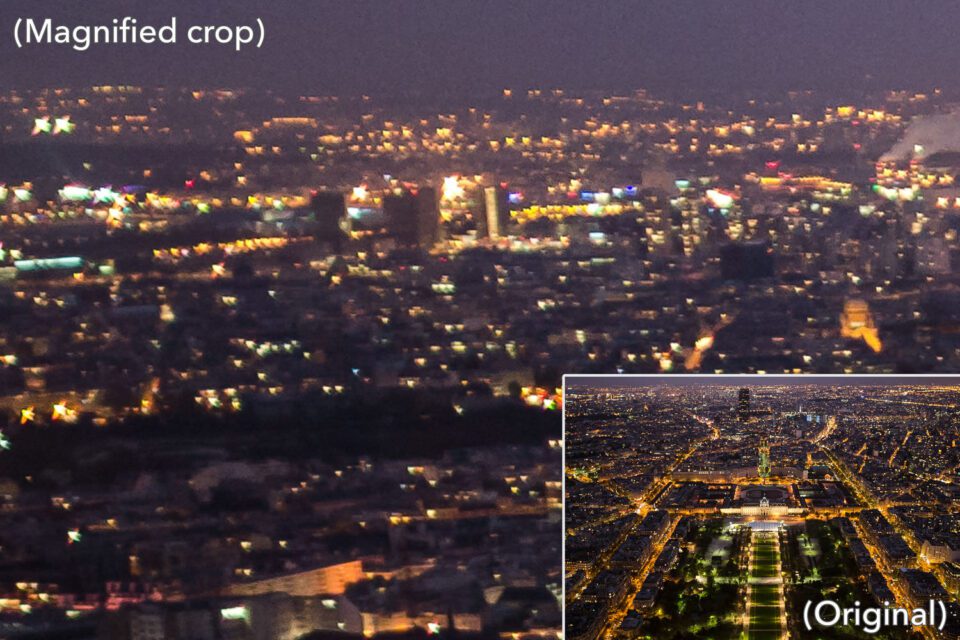
Although most problems in photography are because of user error – things like missed focus, poor exposure, or a distracting composition – lens aberrations are entirely due to your equipment. They are fundamental, optical problems that you’ll notice with any lens if you look too closely, although some lenses are better than others. For example, consider the image below:
هذه واحدة ممتعة. لسبب ما، يرغب الجميع في التقاط صور واضحة! وتتمثل إحدى الطرق للقيام بذلك في تقليل إمكانية رؤية انحرافات العدسة. إذًا، ما هي انحرافات العدسة؟ بكل بساطة، إنها مشكلات في جودة الصورة ناتجة عن العدسة.
على الرغم من أن معظم المشكلات في التصوير الفوتوغرافي تكون بسبب خطأ المستخدم – أشياء مثل التركيز المفقود أو التعرض الضعيف أو التركيب المشتت للانتباه – فإن انحرافات العدسة ترجع بالكامل إلى أجهزتك. إنها مشاكل بصرية أساسية ستلاحظها مع أي عدسة إذا نظرت عن كثب، على الرغم من أن بعض العدسات أفضل من غيرها. على سبيل المثال، تأمل الصورة أدناه:
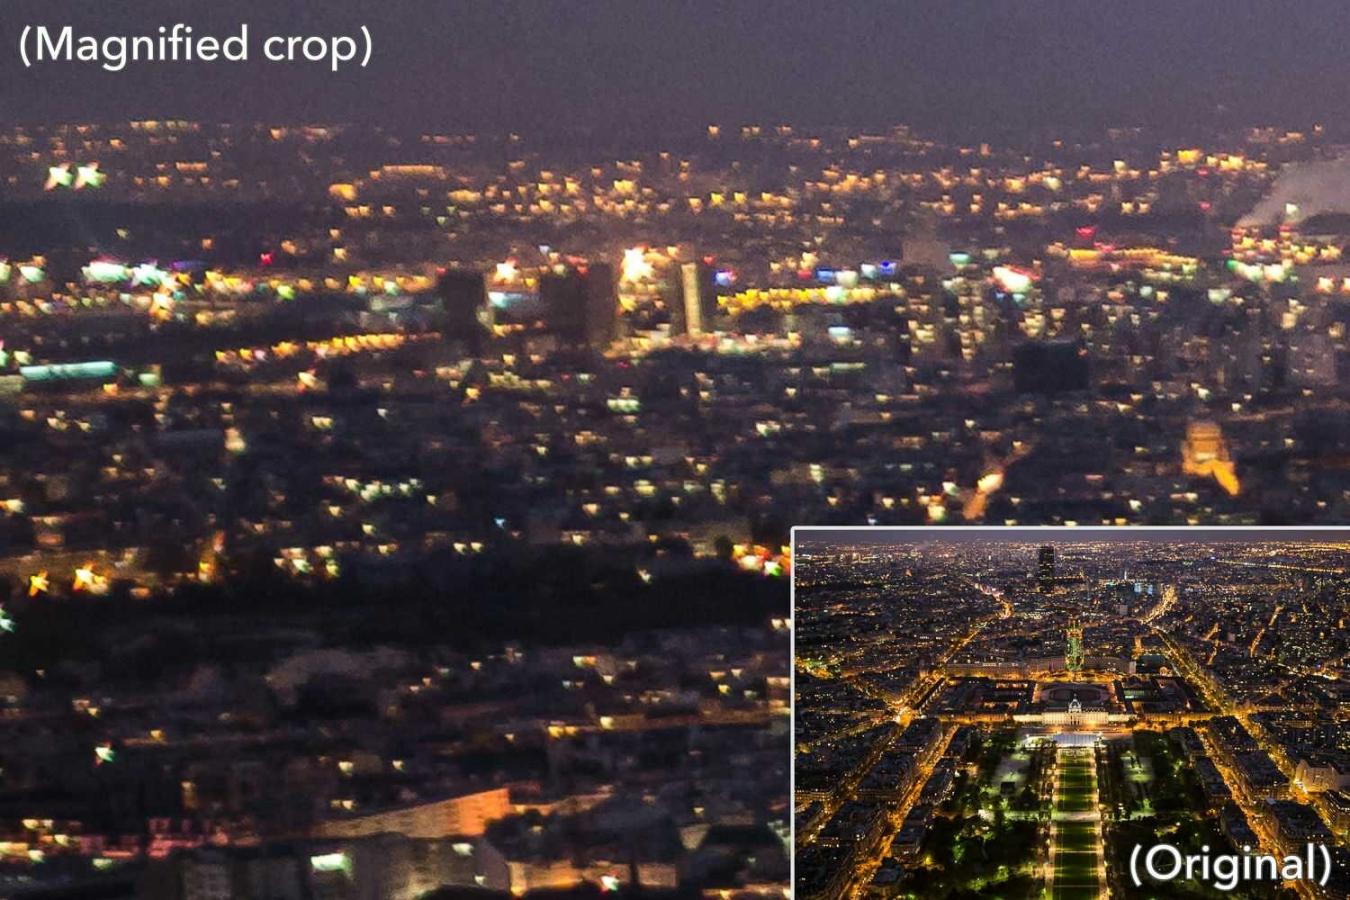
It’s likely that your lenses are blurrier at certain apertures than others, and it’s almost always blurrier in the corner of the image than the center. That’s due to lens aberrations.
Aberrations can appear in several different forms. This article would be way too long if I explained every possible aberration in detail: vignetting, spherical aberration, field curvature, coma, distortion, color fringing, and more. Instead, it’s more important to know why aberrations occur, including how your aperture setting can reduce them.
It starts with a simple fact: designing lenses is difficult. When the manufacturer fixes one problem, another tends to appear. It’s no surprise that modern lens designs are extremely complex.
Unfortunately, even today’s lenses aren’t perfect. They tend to work fine in the center of an image, but everything gets worse near the edges. That’s because lenses are especially difficult to design around the corners.
Here’s a diagram that explains what I mean:
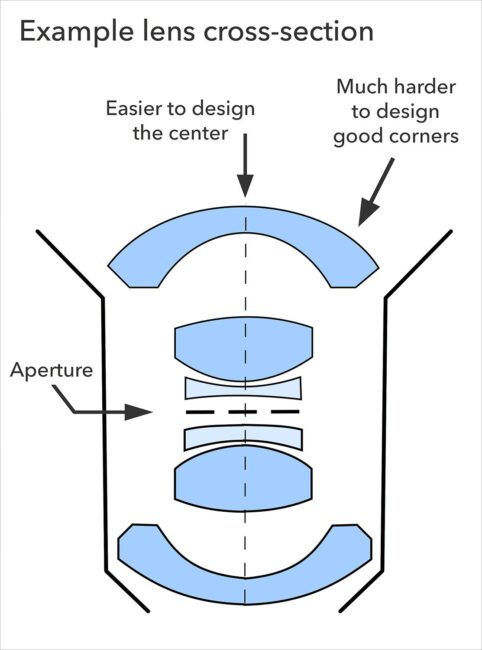 Adapted from a Creative Commons image on Wikipedia.
And that brings us to aperture.
Many people don’t realize a simple fact about aperture: it literally blocks the light transmitted by the edges of your lens. (This doesn’t lead to black corners in your photos, because the center regions of a lens can still transmit light to the edges of your camera sensor.)
من المحتمل أن تكون عدساتك أكثر ضبابية عند فتحات معينة أكثر من غيرها، وتكون دائمًا أكثر ضبابية في زاوية الصورة مقارنة بالمركز. هذا بسبب انحرافات العدسة.
يمكن أن تظهر الانحرافات في عدة أشكال مختلفة. ستكون هذه المقالة طويلة جدًا إذا شرحت كل انحراف محتمل بالتفصيل: التظليل، والانحراف الكروي، وانحناء المجال، والغيبوبة، والتشويه، وتهديب اللون، والمزيد. بدلاً من ذلك، من المهم معرفة سبب حدوث الانحرافات، بما في ذلك كيفية تقليل إعدادات فتحة العدسة لهذه الانحرافات.
يبدأ الأمر بحقيقة بسيطة: تصميم العدسات أمر صعب. عندما تقوم الشركة المصنعة بإصلاح مشكلة ما، تظهر مشكلة أخرى. ليس من المستغرب أن تكون تصميمات العدسات الحديثة معقدة للغاية.
ولسوء الحظ، حتى عدسات اليوم ليست مثالية. تميل إلى العمل بشكل جيد في وسط الصورة، لكن كل شيء يصبح أسوأ بالقرب من الحواف. وذلك لأن العدسات يصعب تصميمها حول الزوايا بشكل خاص.
وفيما يلي رسم تخطيطي يوضح ما أعنيه:
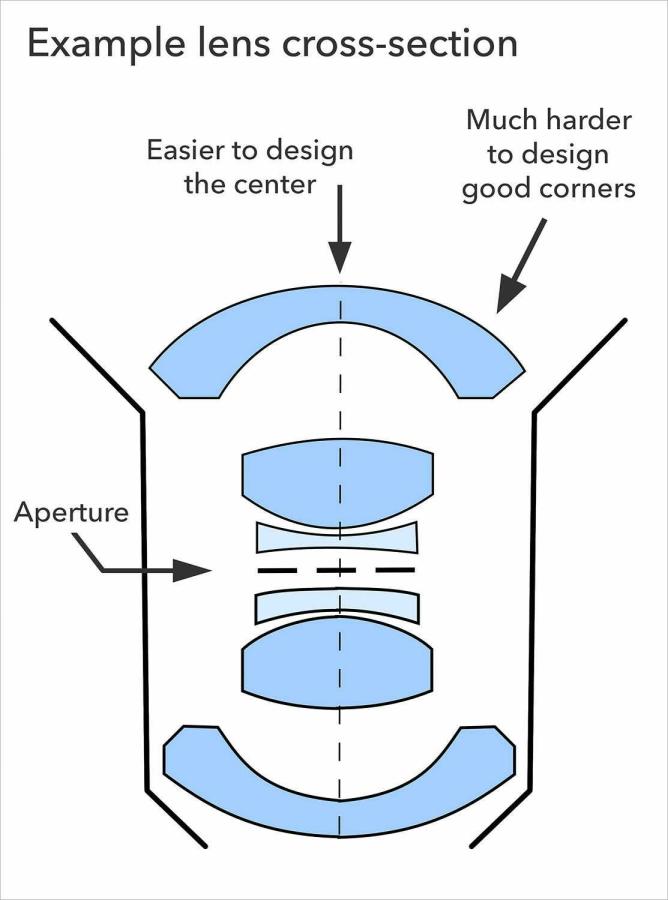
مقتبس من صورة Creative Commons على ويكيبيديا.
وهذا يقودنا إلى الفتحة.
لا يدرك العديد من الأشخاص حقيقة بسيطة حول فتحة العدسة: فهي تحجب الضوء المنقول عبر حواف العدسة. (لا يؤدي هذا إلى زوايا سوداء في صورك، لأن المناطق المركزية للعدسة لا تزال قادرة على نقل الضوء إلى حواف مستشعر الكاميرا.)
How does this look in practice? See the photos below (heavy crops from the top-left corner):
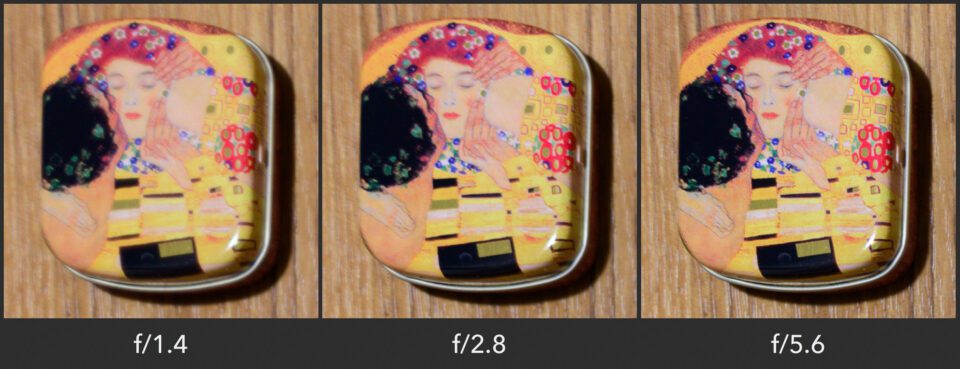
What you’re seeing above may look like an increase in sharpness, but it’s really a decrease in aberrations. The end result? At f/5.6 on this particular lens, my photo is much sharper than at f/1.4.
Here’s a key question: How does this balance out with diffraction, which harms sharpness increasingly more as your aperture gets narrower and narrower?
In practice, the answer is that most lenses end up sharpest around f/4, f/5.6, or f/8. Those “medium” apertures are small enough to block light from the edges of a lens, but they aren’t so small that diffraction is a significant problem. However, you’ll want to test this on your own equipment.
Of course, you can still take good photos at large apertures like f/1.4 or f/2. As I mentioned earlier, portrait photographers sometimes pay thousands of dollars to get a lens exactly for that purpose! So, don’t lock your lens to f/5.6 just because it gives you a tad more corner sharpness up close. It’s better to choose an aperture that gives you the right artistic look to the image.
كيف يبدو هذا في الممارسة العملية؟ انظر الصور أدناه (المحاصيل الثقيلة من الزاوية العلوية اليسرى):
ما تراه أعلاه قد يبدو وكأنه زيادة في الحدة، ولكنه في الواقع انخفاض في الانحرافات. النتيجة النهائية؟ عند f/5.6 على هذه العدسة بالذات، تكون صورتي أكثر وضوحًا من f/1.4.
إليك سؤال رئيسي: كيف يتوازن هذا مع الحيود، الذي يضر بالوضوح بشكل متزايد عندما تصبح فتحة العدسة أضيق فأضيق؟
من الناحية العملية، الجواب هو أن معظم العدسات تنتهي بشكل أكثر وضوحًا عند f/4 أو f/5.6 أو f/8. هذه الفتحات “المتوسطة” صغيرة بما يكفي لحجب الضوء من حواف العدسة، ولكنها ليست صغيرة جدًا بحيث يمثل الحيود مشكلة كبيرة. ومع ذلك، سوف ترغب في اختبار هذا على المعدات الخاصة بك.
بالطبع، لا يزال بإمكانك التقاط صور جيدة بفتحات كبيرة مثل f/1.4 أو f/2. وكما ذكرت سابقًا، يدفع مصورو الصور الشخصية أحيانًا آلاف الدولارات للحصول على عدسة مخصصة لهذا الغرض تحديدًا! لذا، لا تقم بتثبيت عدستك على f/5.6 فقط لأنها تمنحك المزيد من الوضوح في الزاوية عن قرب. من الأفضل اختيار فتحة تمنحك المظهر الفني المناسب للصورة.
Some types of aberrations don’t change much as you stop down, or they may even get slightly worse. Axial chromatic aberration, for example – color fringes near the edges of your frame – often work that way. This is normal. It happens because a small aperture doesn’t inherently reduce aberrations; it simply blocks light that has passed through the edges of your lens. So, naturally, if the edges aren’t the source of your problem, you won’t see an improvement by stopping down.
بعض أنواع الانحرافات لا تتغير كثيرًا عند التوقف، أو قد تتفاقم قليلاً. الانحراف اللوني المحوري، على سبيل المثال – هامش اللون بالقرب من حواف الإطار – غالبًا ما يعمل بهذه الطريقة. هذا امر طبيعي. ويحدث ذلك لأن فتحة العدسة الصغيرة لا تقلل بطبيعتها الانحرافات؛ فهو ببساطة يحجب الضوء الذي يمر عبر حواف العدسة. لذا، بطبيعة الحال، إذا لم تكن الحواف هي مصدر مشكلتك، فلن ترى تحسنًا بالتوقف.
Starbursts, also called sunstars, are beautiful elements that you’ll find in certain photographs. Despite the odd names – one a type of candy; the other a type of starfish – I always try to capture them in my landscape photos. Here’s an example:
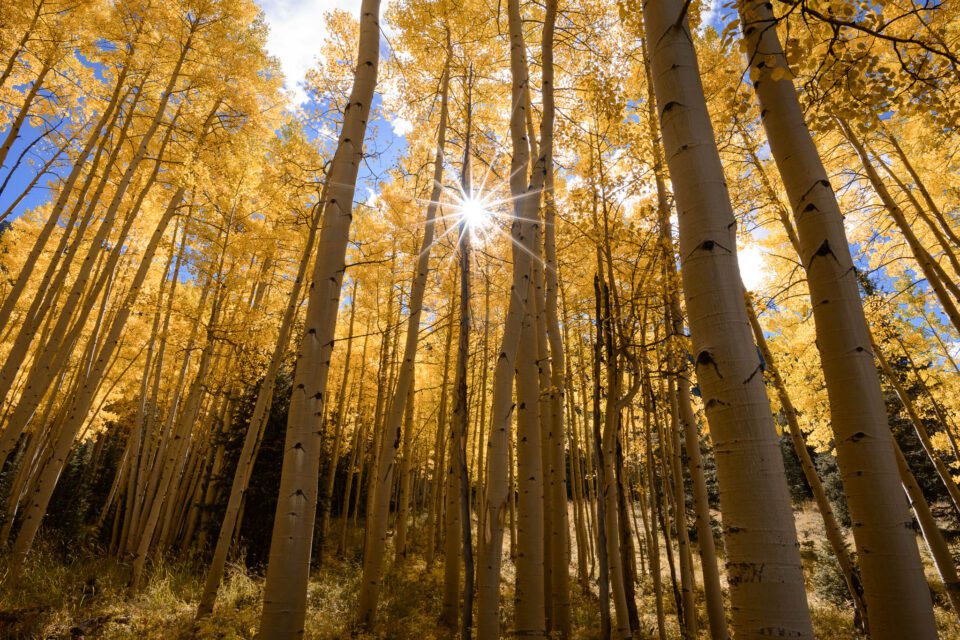 The sunbeams in this photo are purely a result of my aperture (in this case, f/16).
How does this work? Essentially, for every aperture blade in your lens, you’ll end up with a sunbeam. This only happens if you photograph a small, bright point of light, such as the sun when it is partly blocked. This is fairly common in landscape photography. If you want the strongest possible starburst, use a small aperture. Whenever the sun is in my photo, I almost always set f/16 purely to capture this effect.
الانفجارات النجمية، والتي تسمى أيضًا نجوم الشمس، هي عناصر جميلة ستجدها في بعض الصور الفوتوغرافية. على الرغم من الأسماء الغريبة – أحدهما نوع من الحلوى؛ والآخر نوع من نجم البحر – أحاول دائمًا التقاطه في صور المناظر الطبيعية. هنا مثال:
أشعة الشمس في هذه الصورة هي نتيجة لفتحة العدسة فقط (في هذه الحالة، f/16).
كيف يعمل هذا؟ بشكل أساسي، مقابل كل فتحة عدسة في عدستك، سينتهي بك الأمر بشعاع شمس. يحدث هذا فقط إذا قمت بتصوير نقطة ضوء صغيرة ومشرقة، مثل الشمس عندما تكون محجوبة جزئيًا. هذا أمر شائع إلى حد ما في تصوير المناظر الطبيعية. إذا كنت تريد أقوى انفجار نجمي ممكن، فاستخدم فتحة صغيرة. عندما تكون الشمس في صورتي، أقوم دائمًا بتعيين f/16 فقط لالتقاط هذا التأثير.
Wait, what?
That’s no typo. You always end up with an even number of sunbeams. If your lens has an odd number of aperture blades, you’ll get double the number of sunbeams.
It sounds strange, but the reason is actually quite simple. In lenses with an even number of aperture blades (and a fully symmetrical design), half of the sunbeams will overlap the other half. So, you don’t see all of them in your final photo.
Here’s a diagram to show what I mean:
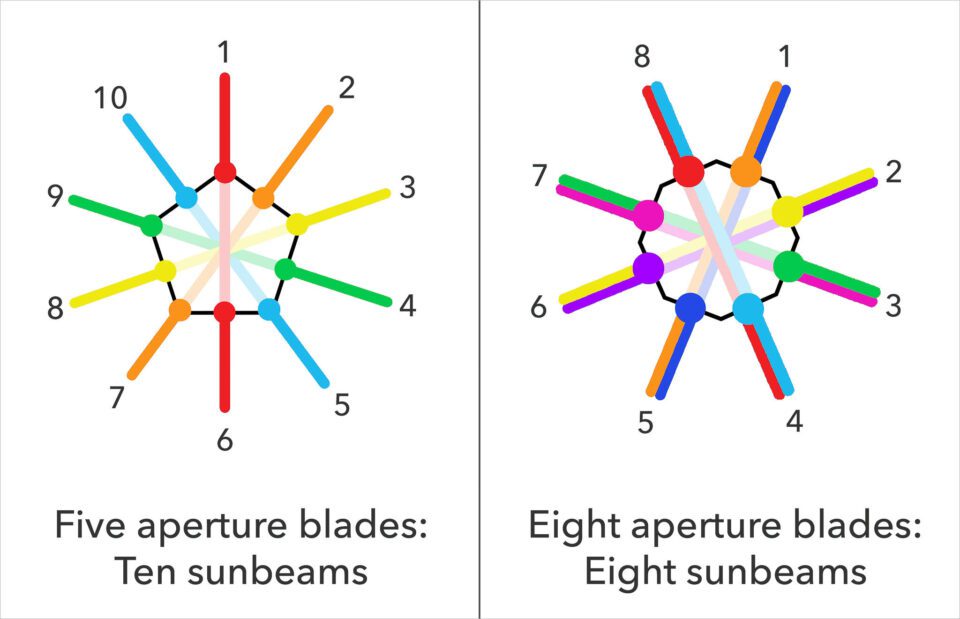 When you have an even number of aperture blades, the sunbeams will overlap.
انتظر ماذا؟
هذا ليس خطأ مطبعي. ينتهي بك الأمر دائمًا بعدد زوجي من أشعة الشمس. إذا كانت عدستك تحتوي على عدد فردي من شفرات الفتحة، فستحصل على ضعف عدد أشعة الشمس.
يبدو الأمر غريبا، ولكن السبب في الواقع بسيط للغاية. في العدسات ذات العدد الزوجي من شفرات الفتحة (والتصميم المتماثل بالكامل)، سوف يتداخل نصف أشعة الشمس مع النصف الآخر. لذلك، لا ترى كل منهم في صورتك النهائية.
وفيما يلي رسم تخطيطي لإظهار ما أعنيه:
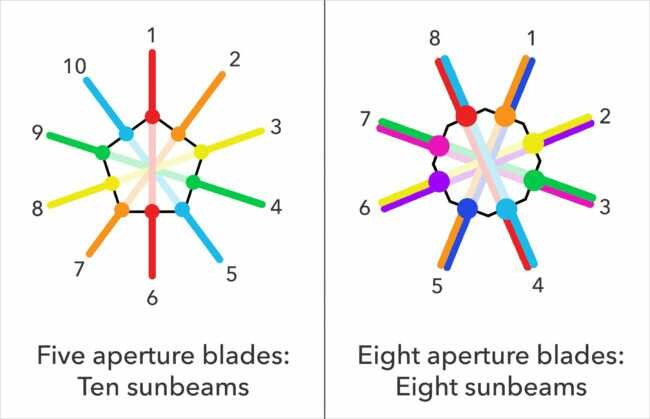
عندما يكون لديك عدد زوجي من شفرات الفتحة، ستتداخل أشعة الشمس.
It’s not just the number of blades that matters, though — their shape is also important. Some aperture blades are rounded (which results in a more pleasant out-of-focus background blur), and others are straight. If your goal is to capture good starbursts, straight aperture blades typically produce more defined rays of light.
Again, some lenses are better than others in this regard. For the best results, find a lens that’s known to have good starbursts, and then set it to a small aperture like f/16. That’s going to give you the strongest definition in your starbursts.
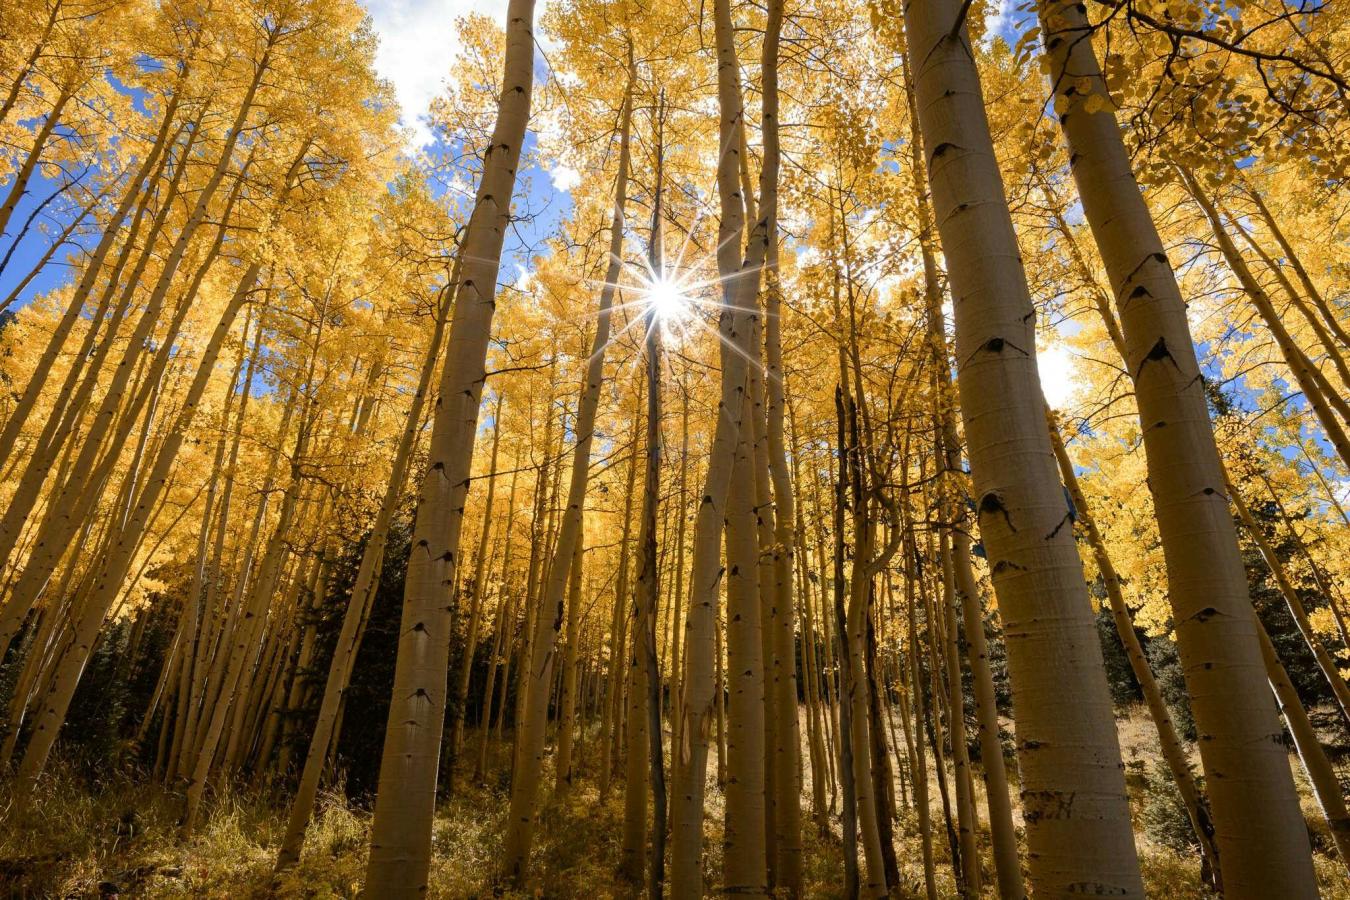
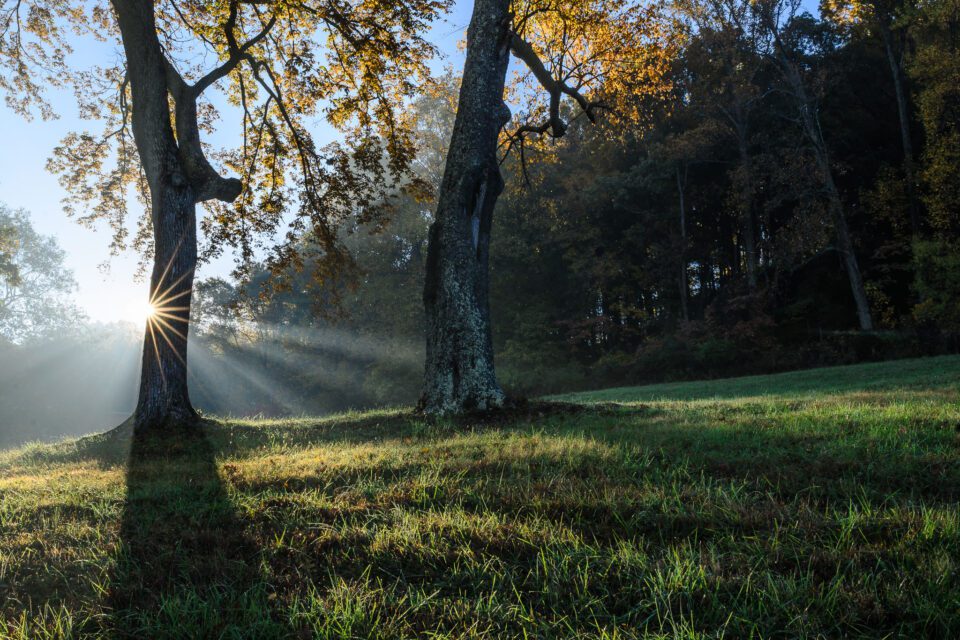 Another image with a starburst using a 24mm f/1.4 lens
NIKON D7000 + 24mm f/1.4 @ 24mm, ISO 100, 1/50, f/16.0
Finally, there’s one last related effect that I wanted to mention briefly. When you shoot into the sun, you might end up with flare in your photographs, as shown below. Depending upon your chosen aperture, the size and shape of this lens flare may change slightly. This isn’t a big deal, but it still exists.
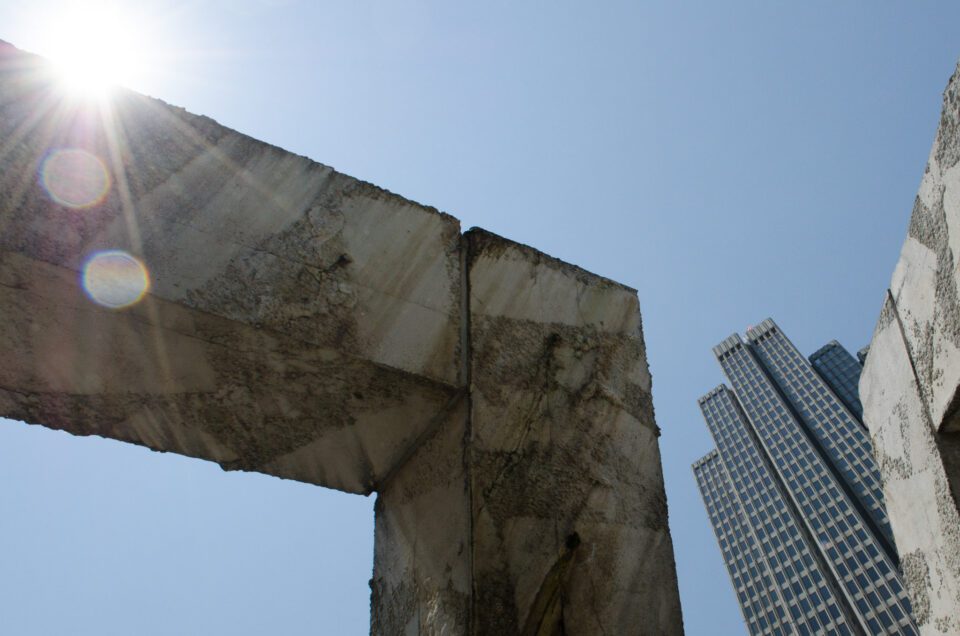 The flare in this photo is shaped like my lens aperture blades.
لا يقتصر الأمر على عدد الشفرات فحسب، بل إن شكلها مهم أيضًا. يتم تقريب بعض شفرات الفتحة (مما يؤدي إلى ضبابية خلفية أكثر متعة خارج نطاق التركيز)، والبعض الآخر مستقيم. إذا كان هدفك هو التقاط انفجارات نجمية جيدة، فعادةً ما تنتج الشفرات ذات الفتحة المستقيمة أشعة ضوئية أكثر تحديدًا.
مرة أخرى، بعض العدسات أفضل من غيرها في هذا الصدد. للحصول على أفضل النتائج، ابحث عن عدسة معروفة بأنها تحتوي على انفجارات نجمية جيدة، ثم اضبطها على فتحة صغيرة مثل f/16. سيعطيك هذا التعريف الأقوى للانفجارات النجمية.
صورة أخرى للانفجار النجمي باستخدام عدسة مقاس 24 مم f/1.4
نيكون D7000 + 24 مم f/1.4 @ 24 مم، ISO 100، 1/50، f/16.0
أخيرًا، هناك تأثير أخير ذو صلة أردت أن أذكره باختصار. عند التصوير في الشمس، قد ينتهي بك الأمر إلى ظهور توهج في صورك، كما هو موضح أدناه. اعتمادًا على الفتحة التي اخترتها، قد يتغير حجم وشكل توهج العدسة قليلاً. هذه ليست مشكلة كبيرة، لكنها لا تزال موجودة.
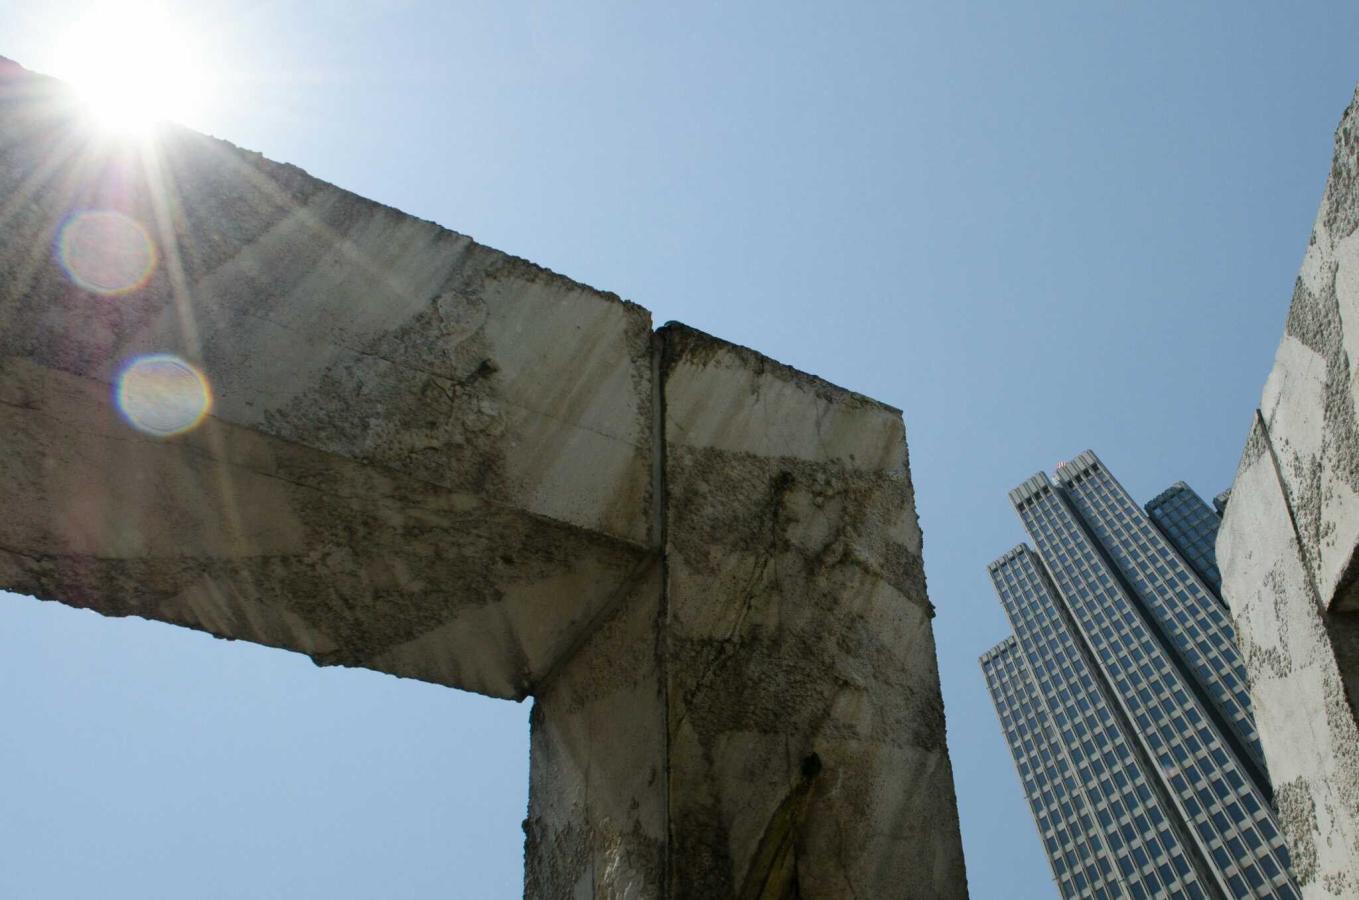
التوهج في هذه الصورة على شكل شفرات فتحة العدسة.
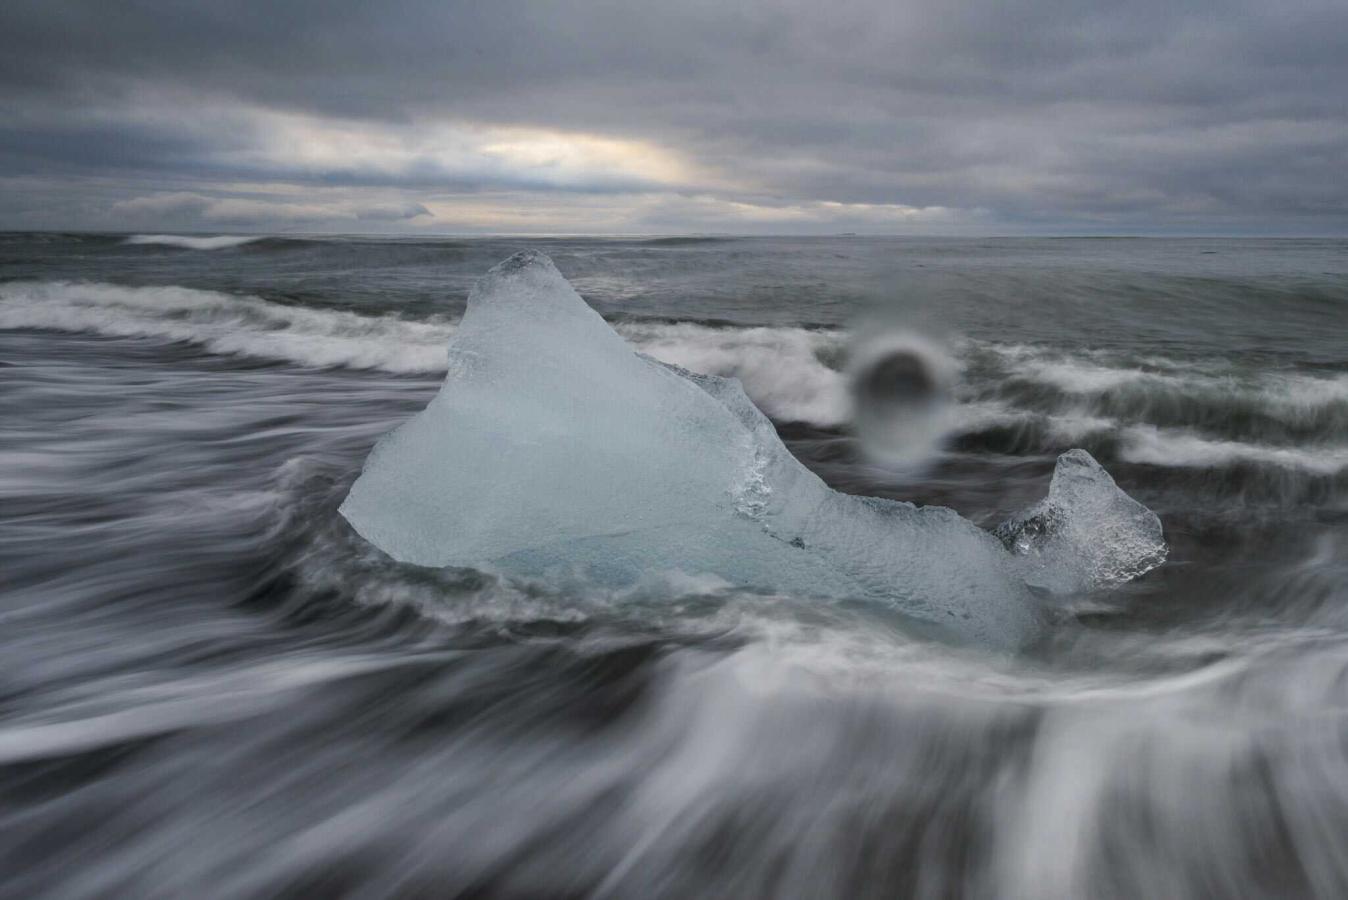
When you shoot through things such as fences, dirty windows, plants, and even water droplets on your lens, you’ll probably be disappointed by photos taken with a small aperture.
Small apertures like f/11 and f/16 give you such a large depth of field that you may accidentally include elements that you don’t want to be in focus! For example, if you’re shooting at a waterfall or by the ocean, an aperture of f/16 could render a tiny water droplet on your lens into a distinct, ugly blob:
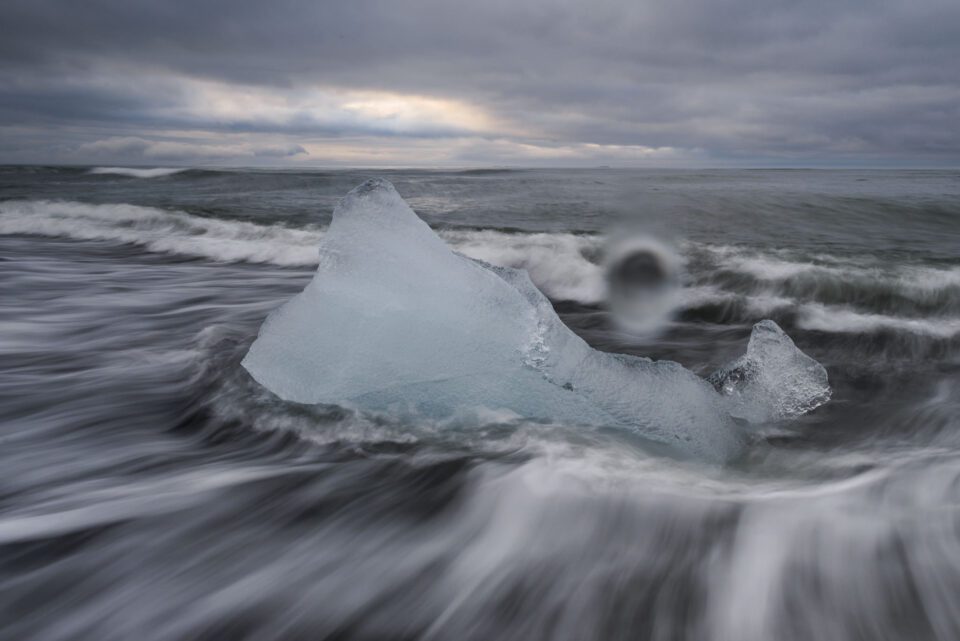 A water droplet landed on my lens while taking this picture. My aperture was f/16, which means that it’s particularly visible.
In cases like that, it’s better just to use a wider aperture – something like f/5.6, perhaps – in order to capture the water droplet so out-of-focus that it doesn’t even appear in your image. In this particular case, you could simply wipe the droplet off, but that’s not possible if you’re shooting through something like a dirty window.
عند التصوير عبر أشياء مثل الأسوار والنوافذ المتسخة والنباتات وحتى قطرات الماء الموجودة على عدستك، فمن المحتمل أن تشعر بخيبة أمل بسبب الصور الملتقطة بفتحة عدسة صغيرة.
تمنحك الفتحات الصغيرة مثل f/11 وf/16 عمقًا كبيرًا للمجال لدرجة أنك قد تقوم عن طريق الخطأ بتضمين عناصر لا تريد التركيز عليها! على سبيل المثال، إذا كنت تقوم بالتصوير عند شلال أو بالقرب من المحيط، فإن فتحة f/16 يمكن أن تحول قطرة ماء صغيرة على عدستك إلى نقطة قبيحة مميزة:
سقطت قطرة ماء على عدستي أثناء التقاط هذه الصورة. كانت فتحة العدسة f/16، مما يعني أنها مرئية بشكل خاص.
في مثل هذه الحالات، من الأفضل استخدام فتحة أوسع – ربما مثل f/5.6 – لالتقاط قطرة الماء خارج نطاق التركيز بحيث لا تظهر حتى في صورتك. في هذه الحالة بالذات، يمكنك ببساطة مسح القطرة، لكن هذا غير ممكن إذا كنت تقوم بالتصوير عبر شيء مثل نافذة متسخة.
You might have realized that this section is really just an extension of depth of field, and that’s true! However, it’s a bit of a special case, so I decided to mention it specifically.
ملاحظة جانبية
ربما تكون قد أدركت أن هذا القسم هو في الحقيقة مجرد امتداد لعمق المجال، وهذا صحيح! ومع ذلك، فهي حالة خاصة بعض الشيء، لذلك قررت أن أذكرها على وجه التحديد.
Luckily, they are very easy to remove in post-production software like Photoshop or Lightroom, though it can be annoying if you have to remove dozens of them from a single photo. That’s why you should always keep your camera sensor clean.
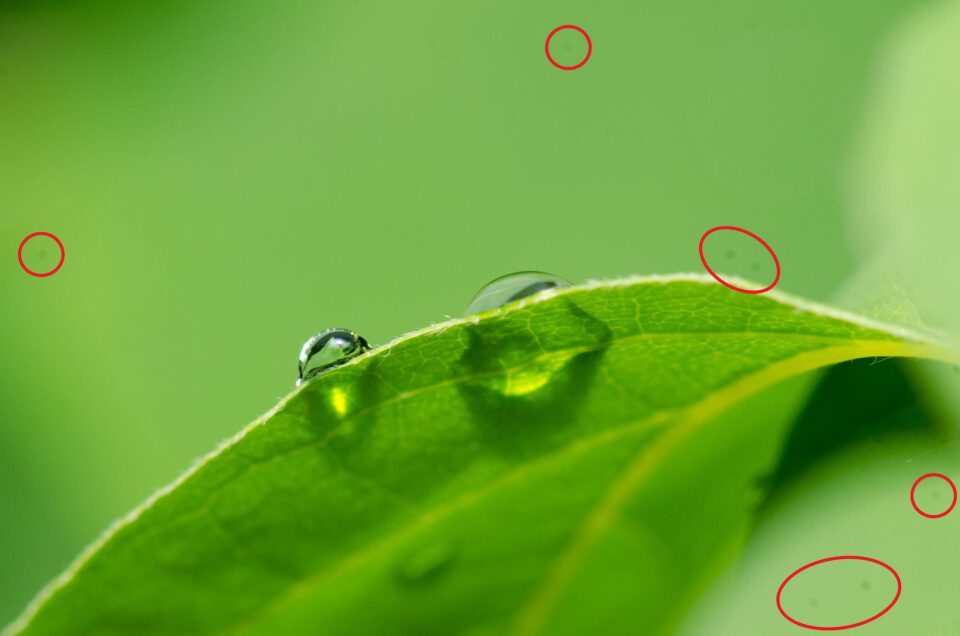 Dust specks on my camera sensor, taken at f/11 (a fairly small aperture). I circled some of the most visible spots in red.
لحسن الحظ، من السهل جدًا إزالتها في برامج ما بعد الإنتاج مثل Photoshop أو Lightroom، على الرغم من أن الأمر قد يكون مزعجًا إذا كان عليك إزالة العشرات منها من صورة واحدة. لهذا السبب يجب عليك دائمًا الحفاظ على نظافة مستشعر الكاميرا.
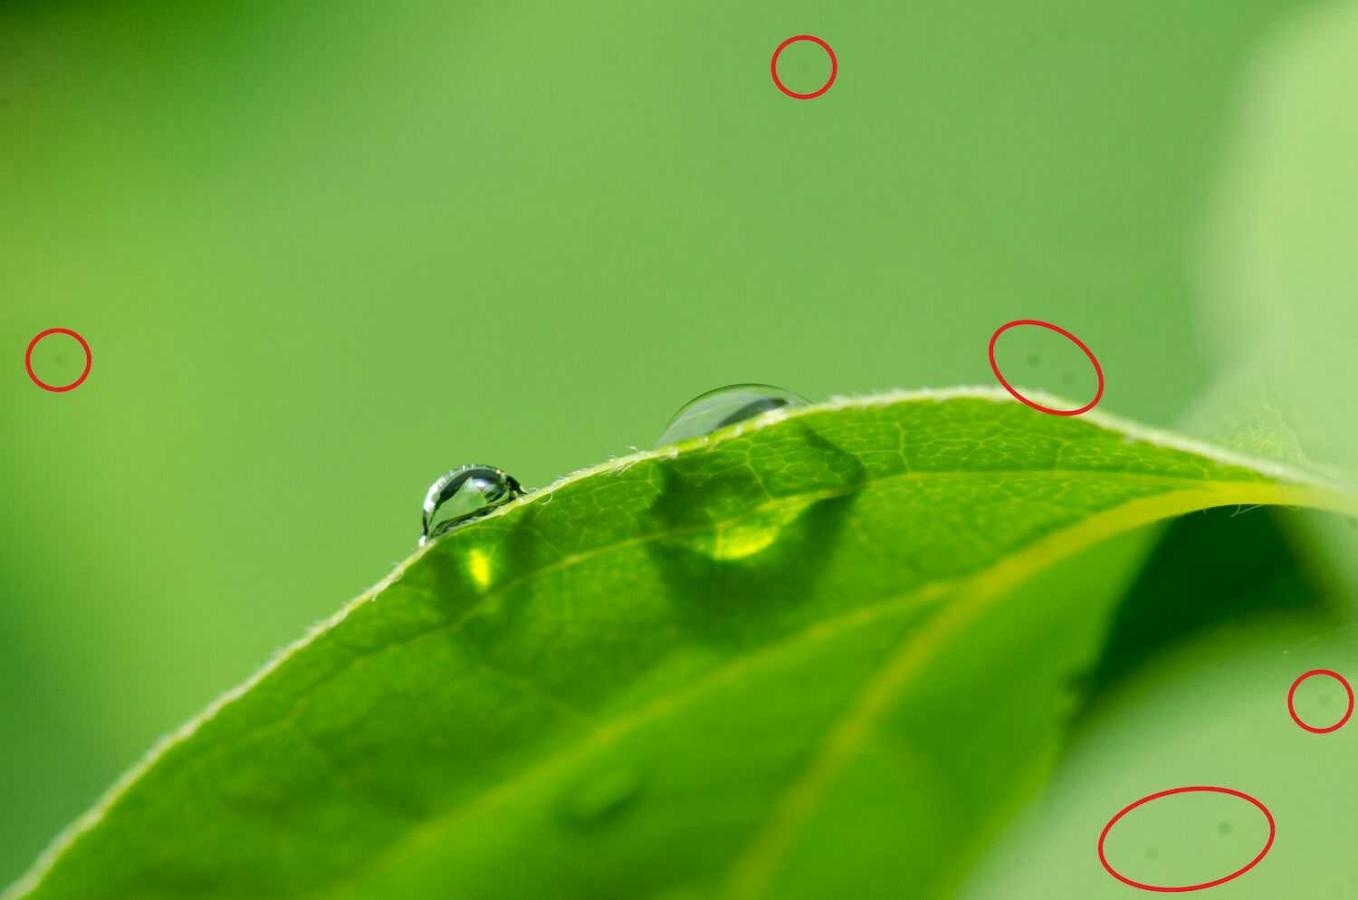
بقع غبار على مستشعر الكاميرا، تم التقاطها بفتحة f/11 (فتحة صغيرة إلى حد ما). لقد قمت بوضع دائرة حول بعض النقاط الأكثر وضوحًا باللون الأحمر.
What is bokeh? It’s simply the quality of your background blur. If you take a lot of portraits, macro photos, or wildlife photos, you’ll end up with out-of-focus backgrounds in most of your images. Naturally, you want them to look as good as possible! Different aperture settings will change the shape of your background blur.
Why is that? It’s because the background blur of your photographs always takes on the shape of your aperture blades. So, if your aperture blades are shaped like a heart, you’ll end up with heart-shaped background blur. Most of the time, that would qualify as distracting bokeh, although it’s kind of cute in this photo of two fake tortoises:
 Heart-shaped background blur, due to a heart-shaped aperture. I didn’t take this photo, unfortunately. Downloaded as Creative Commons.
ما هو البوكيه؟ إنها ببساطة جودة الخلفية الضبابية. إذا كنت تلتقط الكثير من الصور الشخصية أو صور الماكرو أو صور الحياة البرية، فسينتهي بك الأمر بخلفيات خارج نطاق التركيز في معظم صورك. وبطبيعة الحال، تريد لهم أن تبدو جيدة قدر الإمكان! ستؤدي إعدادات الفتحة المختلفة إلى تغيير شكل ضبابية الخلفية.
لماذا هذا؟ وذلك لأن ضبابية الخلفية في صورك الفوتوغرافية تأخذ دائمًا شكل شفرات فتحة العدسة. لذلك، إذا كانت شفرات فتحة العدسة على شكل قلب، فسوف ينتهي بك الأمر إلى خلفية ضبابية على شكل قلب. في معظم الأحيان، قد يكون ذلك بمثابة تأثير بوكيه مشتت للانتباه، على الرغم من أنه لطيف نوعًا ما في هذه الصورة لسلحفاتين مزيفتين:
خلفية ضبابية على شكل قلب، بسبب فتحة على شكل قلب. لم ألتقط هذه الصورة للأسف. تم تنزيله بصيغة Creative Commons.
If bokeh is something that matters to you, you’ll want to test this on your particular lenses. Take some out-of-focus photos of a busy scene, each using a different aperture setting, and see which one looks the best. Most of the time, it will be the lens’s widest aperture, but not always.
 Background blur sample from the top-left corner of the Nikon 24mm f/1.4G. In my opinion, the blur is best at f/1.4 and f/1.8, where it appears the roundest. However, this is inherently subjective.
إذا كان تأثير البوكيه أمرًا مهمًا بالنسبة لك، فستحتاج إلى اختبار ذلك على عدساتك الخاصة. التقط بعض الصور خارج نطاق التركيز البؤري لمشهد مزدحم، كل منها باستخدام إعداد فتحة مختلف، واعرف أيها يبدو الأفضل. في معظم الأحيان، ستكون الفتحة الأوسع للعدسة، ولكن ليس دائمًا.

نموذج تمويه الخلفية من الزاوية العلوية اليسرى لكاميرا Nikon مقاس 24 مم f/1.4G. في رأيي، يكون التمويه أفضل عند f/1.4 وf/1.8، حيث يبدو مستديرًا. ومع ذلك، هذا أمر ذاتي بطبيعته.
With certain lenses – even if you’re in manual focus, and you don’t move your focus ring – your point of focus may shift as you use smaller and smaller apertures.
Obviously, this isn’t ideal. How do you tell if your lens has problematic focus shift? It’s pretty easy. Here are the steps:
You’re done!
If your lens has extreme levels of focus shift, you’ll want to compensate for it:
مع عدسات معينة – حتى لو كنت في وضع التركيز البؤري اليدوي، ولم تقم بتحريك حلقة التركيز البؤري – قد تتغير نقطة التركيز البؤري أثناء استخدام فتحات أصغر فأصغر.
من الواضح أن هذا ليس مثاليًا. كيف يمكنك معرفة ما إذا كانت عدستك تواجه مشكلة في إزاحة التركيز البؤري؟ إنه سهل جدًا. فيما يلي الخطوات:
ضع الكاميرا على حامل ثلاثي الأرجل، واضبط العدسة على التركيز اليدوي. ابحث عن كائن بتفاصيل صغيرة تمتد إلى الخلف، وقم بالتركيز في منتصفه. طاولة بها مفرش طاولة تعمل بشكل جيد. تحقق مرة أخرى: عند التقاط صورة اختبارية وتكبيرها، يجب أن ترى تفاصيل على مستوى البكسل، بالإضافة إلى أجزاء من الصورة التي تكون خارج نطاق التركيز بشكل واضح. التقط صورة بأوسع فتحة للعدسة. ، ثم بفتحات أصغر تدريجيًا. تأكد من عدم تحريك حلقة التركيز البؤري، وتأكد مرة أخرى من أنك تستخدم التركيز البؤري اليدوي. على جهاز الكمبيوتر الخاص بك، قم بتكبير هذه الصور بنسبة 100% ومعرفة ما إذا كانت نقطة التركيز الأكثر وضوحًا تتحرك بشكل مستمر إلى الخلف عند التوقف. كلما تحركت أكثر، كلما كانت مشكلة تحول التركيز لديك أسوأ.
انت انتهيت!
إذا كانت عدستك تتمتع بمستويات شديدة من تحول التركيز البؤري، فستحتاج إلى التعويض عنها:
مع الفتحة الأوسع، ما عليك سوى التركيز كالمعتاد. عند إيقاف فتحة العدسة، تأكد من ضبط فتحة العدسة أولاً، ثم التركيز ثانيًا (بدلاً من التركيز أولاً). في كاميرات DSLR، نوصي بالتركيز في المنظر المباشر على هذه الفتحات، لأن محدد المنظر يركز دائمًا على الفتحة الأوسع. لا داعي للقلق بشأن ذلك بالنسبة لمستخدمي الكاميرات عديمة المرآة. مع الفتحات الصغيرة مثل f/8 وما بعدها، سيكون عمق المجال كبيرًا بما يكفي لإخفاء أي مشاكل في تحويل التركيز البؤري، لذا ركز فقط كالمعتاد.
When it comes down to it, focus shift is just another type of lens aberration. The edges of your lens may not focus light the same as the center, so, by stopping down — again, blocking light from the edges — your focus point changes slightly. That’s the underlying reason for this effect.
ملاحظة جانبية
عندما يتعلق الأمر بذلك، فإن تحول التركيز البؤري هو مجرد نوع آخر من انحراف العدسة. قد لا تركز حواف عدستك الضوء بنفس الطريقة التي يركز بها المركز، لذلك، من خلال التوقف – مرة أخرى، حجب الضوء من الحواف – تتغير نقطة التركيز قليلاً. هذا هو السبب الكامن وراء هذا التأثير.
The autofocus system on your camera doesn’t work well unless it receives plenty of light.
So, if you’re shooting with a cheaper lens like a 70-300mm f/4.5-5.6, the largest aperture isn’t bright enough to gather a lot of light. Focusing in dark conditions may be impacted. This is part of why a lot of pro photographers will use a more expensive lens like a 70-200mm f/2.8 instead.
You’ll also enjoy a brighter viewfinder (on a DSLR) or a less noisy viewfinder (on a mirrorless camera) if your lens has a large maximum aperture. If you shoot a lot in low light, this can make it much easier to focus and compose your images.
لا يعمل نظام التركيز التلقائي في الكاميرا بشكل جيد إلا إذا تلقى الكثير من الضوء.
لذا، إذا كنت تقوم بالتصوير باستخدام عدسة أرخص مثل 70-300 مم f/4.5-5.6، فإن الفتحة الأكبر ليست مشرقة بما يكفي لتجميع الكثير من الضوء. قد يتأثر التركيز البؤري في الظروف المظلمة. وهذا جزء من سبب استخدام الكثير من المصورين المحترفين لعدسة أكثر تكلفة مثل عدسة مقاس 70-200 مم f/2.8 بدلاً من ذلك.
ستستمتع أيضًا بمعين منظر أكثر سطوعًا (في كاميرا DSLR) أو معين منظر أقل ضوضاء (في كاميرا بدون مرآة) إذا كانت عدستك تحتوي على فتحة قصوى كبيرة. إذا قمت بالتصوير كثيرًا في الإضاءة المنخفضة، فقد يسهل ذلك التركيز وتكوين الصور.
When using speedlights or any kind of strobes, it is important to remember that aperture takes on a whole different role of controlling flash exposure. While shutter speed’s role becomes controlling ambient light, aperture has an outsized impact on how much light from your flash is captured. Even though it’s just a subset of exposure, we wanted to include it in this section, since flash is tightly correlated to lens aperture.
عند استخدام فلاشات السرعة أو أي نوع من الومضات، من المهم أن تتذكر أن فتحة العدسة تلعب دورًا مختلفًا تمامًا في التحكم في التعرض للفلاش. بينما يصبح دور سرعة الغالق هو التحكم في الإضاءة المحيطة، يكون للفتحة تأثير كبير على مقدار الضوء الذي يتم التقاطه من الفلاش. على الرغم من أنها مجرد مجموعة فرعية من التعريض الضوئي، فقد أردنا تضمينها في هذا القسم، نظرًا لأن الفلاش يرتبط ارتباطًا وثيقًا بفتحة العدسة.
Once you understand the information above, you will know everything aperture does to your photos. However, it may take a few re-reads of this article before it’s all completely clear.
Practice is your best friend. Go outside, take some photos, and get a feel for aperture yourself.
If it helps, I compiled the main information in this article into a chart. This chart covers the most important effects of aperture in photography, as well as common terms that photographers use to describe their settings.
Note that to make this diagram easier to see, I did not darken or lighten any of the sample illustrations (as would occur in the real world). Instead, I simply wrote “brightest” through “darkest”:
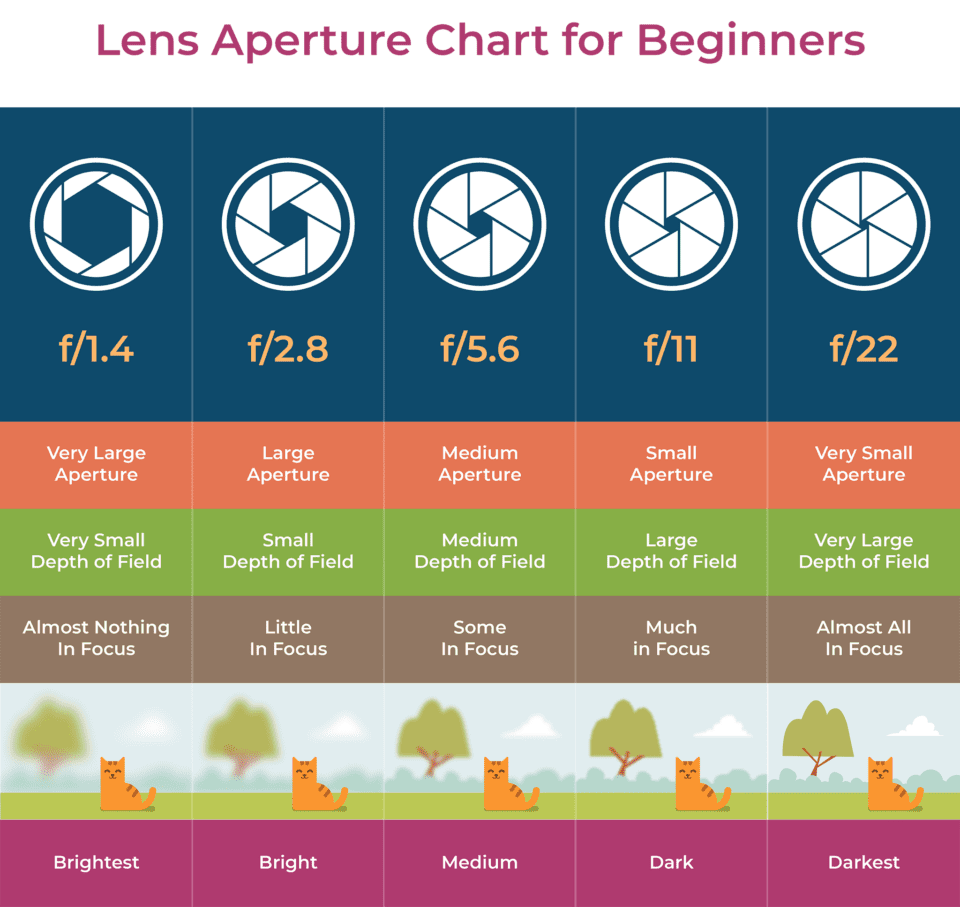
Although this chart is intentionally simplified, it covers all the basics that you need to know. Feel free to download and print this chart if you find it useful. Just right-click on the image, then select “save as,” and pick the location where you want to store it.
بمجرد فهم المعلومات الواردة أعلاه، ستعرف كل ما تفعله الفتحة بصورك. ومع ذلك، قد يستغرق الأمر بضع مرات لإعادة قراءة هذه المقالة قبل أن يصبح الأمر واضحًا تمامًا.
الممارسة هي أفضل صديق لك. اذهب للخارج والتقط بعض الصور وتعرف على الفتحة بنفسك.
إذا كان ذلك مفيدًا، فقد قمت بتجميع المعلومات الرئيسية الواردة في هذه المقالة في مخطط. يغطي هذا المخطط أهم تأثيرات فتحة العدسة في التصوير الفوتوغرافي، بالإضافة إلى المصطلحات الشائعة التي يستخدمها المصورون لوصف إعداداتهم.
لاحظ أنه لتسهيل رؤية هذا المخطط، لم أقم بتعتيم أو تفتيح أي من نماذج الرسوم التوضيحية (كما يحدث في العالم الحقيقي). بدلاً من ذلك، كتبت ببساطة “ألمع” إلى “أغمق”:
على الرغم من أن هذا المخطط تم تبسيطه عن عمد، إلا أنه يغطي جميع الأساسيات التي تحتاج إلى معرفتها. لا تتردد في تنزيل وطباعة هذا المخطط إذا وجدت أنه مفيد. فقط انقر بزر الماوس الأيمن على الصورة، ثم حدد “حفظ باسم”، واختر الموقع الذي تريد تخزينها فيه.
We put together some of the most frequently-asked questions related to aperture below.
What is Aperture?
Aperture can be defined as the opening in a lens through which light passes to enter the camera. It is expressed in f-numbers like f/1.4, f/2, f/2.8 and so on to express the size of the lens opening, which can be controlled through the lens or the camera. Our full article on aperture with many examples and illustrations starts here.
How Does Aperture Affect Depth of Field?
A large aperture results in a large amount of foreground and background blur. This yields a shallow depth of field, AKA a shallow focus effect. On the other hand, a small aperture results in a wide depth of field that can give you a sharp foreground and background for landscape photography.
How Does Aperture Affect Shutter Speed?
Aperture and shutter speed are controlled separately. However, they both affect a photo’s exposure. If you “open up” the aperture to capture a lot of light, you can use faster shutter speeds like 1/1000 second. Or, if you “stop down” the aperture to get more depth of field, you are reducing the amount of light that reaches the camera sensor, which requires a longer shutter speed to yield an image with the same brightness.
How Does Aperture Affect Bokeh?
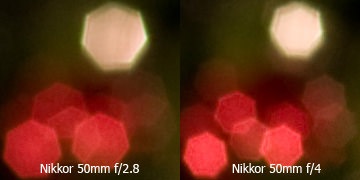
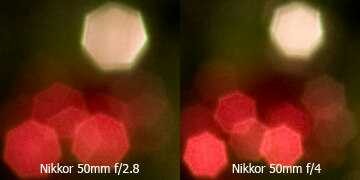
Bokeh refers to the quality of out-of-focus highlights of the image rendered by the camera lens. Using the maximum aperture of the lens will typically yield circular background highlights of large size, whereas stopping down the lens will typically result in highlights looking smaller and taking different shapes such as heptagon. These shapes depend on the number of aperture blades and their roundness. Here is an image of a 50mm f/1.4 prime lens stopped down to f/2.8 and f/4 apertures:
لقد قمنا بتجميع بعض الأسئلة الأكثر شيوعًا المتعلقة بالفتحة أدناه.
ما هي الفتحة؟
يمكن تعريف الفتحة بأنها فتحة في العدسة يمر من خلالها الضوء ليدخل إلى الكاميرا. ويتم التعبير عنها بالأرقام البؤرية مثل f/1.4 وf/2 وf/2.8 وما إلى ذلك للتعبير عن حجم فتحة العدسة، والتي يمكن التحكم فيها من خلال العدسة أو الكاميرا. مقالتنا الكاملة عن الفتحة مع العديد من الأمثلة والرسوم التوضيحية تبدأ هنا.
كيف تؤثر الفتحة على عمق المجال؟
تؤدي الفتحة الكبيرة إلى كمية كبيرة من ضبابية المقدمة والخلفية. وينتج عن ذلك عمق مجال ضحل، يُعرف أيضًا باسم تأثير التركيز البؤري الضحل. من ناحية أخرى، تؤدي الفتحة الصغيرة إلى عمق واسع للمجال يمكن أن يمنحك مقدمة وخلفية حادة لتصوير المناظر الطبيعية.
كيف تؤثر فتحة العدسة على سرعة الغالق؟
يتم التحكم في فتحة العدسة وسرعة الغالق بشكل منفصل. ومع ذلك، يؤثر كلاهما على درجة تعرض الصورة. إذا قمت “بفتح” الفتحة لالتقاط الكثير من الضوء، فيمكنك استخدام سرعات غالق أسرع مثل 1/1000 ثانية. أو، إذا قمت “بإيقاف” فتحة العدسة للحصول على مزيد من عمق المجال، فإنك تقلل من كمية الضوء التي تصل إلى مستشعر الكاميرا، الأمر الذي يتطلب سرعة غالق أطول للحصول على صورة بنفس السطوع.
كيف تؤثر فتحة العدسة على البوكيه؟
يشير البوكيه إلى جودة المناطق البارزة خارج نطاق التركيز البؤري للصورة التي تعرضها عدسة الكاميرا. سيؤدي استخدام الحد الأقصى للفتحة للعدسة إلى إنتاج إبرازات خلفية دائرية ذات حجم كبير، في حين أن إيقاف العدسة سيؤدي عادةً إلى إبرازات تبدو أصغر حجمًا وتتخذ أشكالًا مختلفة مثل المضلع السباعي. تعتمد هذه الأشكال على عدد شفرات الفتحة واستدارتها. فيما يلي صورة لعدسة رئيسية مقاس 50 مم f/1.4 متوقفة عند فتحات f/2.8 وf/4:
Maximum aperture is how wide a lens can be open. It is usually expressed in f-stops such as f/1.4 and stated on the name of the lens. For example, the Nikon 35mm f/1.4G lens has a maximum aperture of f/1.4, whereas the Nikon 50mm f/1.8G has a maximum aperture of f/1.8. Some lenses have variable maximum apertures that change depending on focal length. A lens like the Nikon 18-55mm f/3.5-5.6 has a maximum aperture of f/3.5 at 18mm and f/5.6 at 55mm.
Which Aperture is Best for Portrait Photography?
If your goal is to make an image with shallow depth of field, where the subject appears sharp while the foreground and the background appear blurry, then you should use very wide apertures like f/1.8 or f/2.8 (for example, if you are using a 50mm f/1.8 lens, you should set your lens aperture to f/1.8).
Which Aperture is Best for Landscape Photography?
When photographing landscapes, you often want to have as much depth of field as possible in order to get both foreground and background looking as sharp as possible. In such cases, it is best to stop down your lens to small apertures like f/8 or f/11.
الحد الأقصى للفتحة هو مدى اتساع العدسة التي يمكن فتحها. يتم التعبير عنها عادةً بـ f-stops مثل f/1.4 ويتم ذكرها على اسم العدسة. على سبيل المثال، تتمتع عدسة Nikon مقاس 35 مم f/1.4G بفتحة قصوى تبلغ f/1.4، في حين تتمتع عدسة Nikon مقاس 50 مم f/1.8G بفتحة قصوى تبلغ f/1.8. تحتوي بعض العدسات على فتحات قصوى متغيرة تتغير حسب الطول البؤري. تتمتع عدسة مثل Nikon مقاس 18-55 مم f/3.5-5.6 بفتحة قصوى تبلغ f/3.5 عند 18 مم وf/5.6 عند 55 مم.
ما هي الفتحة الأفضل لتصوير البورتريه؟
إذا كان هدفك هو إنشاء صورة بعمق مجال سطحي، حيث يظهر الهدف حادًا بينما تظهر المقدمة والخلفية ضبابيتين، فيجب عليك استخدام فتحات واسعة جدًا مثل f/1.8 أو f/2.8 (على سبيل المثال، إذا كنت باستخدام عدسة مقاس 50 مم f/1.8، يجب عليك ضبط فتحة العدسة على f/1.8).
ما هي الفتحة الأفضل لتصوير المناظر الطبيعية؟
عند تصوير المناظر الطبيعية، غالبًا ما تريد الحصول على أكبر قدر ممكن من عمق المجال حتى تبدو المقدمة والخلفية حادة قدر الإمكان. في مثل هذه الحالات، من الأفضل تثبيت العدسة على فتحات صغيرة مثل f/8 أو f/11.
It really depends on what you are photographing and what you want your image to look like. Lower apertures like f/1.8 allow more light to pass through the lens and yield shallow depth of field. In comparison, higher aperture numbers like f/8 block light while yielding wider depth of field. Both have their uses in photography.
Does Aperture Affect Focus?
Changing lens aperture can affect focus slightly due to focus shift. It is therefore best to stop the lens down to the desired aperture before focusing. On DSLR cameras, we recommend to use live view to focus at the desired aperture to reduce the negative effect of focus shift. This is due to the fact that DSLR cameras focus at the widest aperture.
At What Aperture is Everything in Focus?
That really depends on your camera’s sensor size, focal length of the lens, and how close your camera is to your subject. Generally, a small aperture like f/8 will give you enough depth of field to be able to make most of your image sharp. However, if the subject is too close to your camera, you might need to either move back or stop down the lens even further to get everything looking sharp.
How Does Aperture Affect Sharpness?
A wide aperture yields shallower depth of field, which some photographers mistake for a blurry photo. Wide apertures also show the weaknesses of the lens optical design, often resulting in visible lens aberrations. A narrow aperture, on the other hand, yields more depth of field, making more of the image appear sharp. However, narrow apertures also have more low-level image blur due to diffraction.
Which Aperture is Best for Sharpness?
Most lenses are not designed to yield good sharpness at their maximum aperture, which is why it is often desirable to stop down to smaller apertures like f/5.6 to get the best results. However, the best aperture of the lens, or its “sweet spot” really depends on its optical design.
What Aperture Should I Use to Get a Blurry Background?
If you want to get your subject isolated from the scene and make the background appear blurry, you should open up the lens aperture to its maximum aperture and get as close to the subject as possible. For example, if you are shooting with a 50mm f/1.8 prime lens, you should shoot at f/1.8 with your subject at a close distance. If you use a zoom lens, you should zoom in to the longest focal length and use the widest aperture, while being as close to your subject as you can. For example, if you are shooting with a 18-55mm f/3.5-5.6 lens, you should zoom to 55mm, use the maximum aperture of f/5.6 and get close to your subject.
What Aperture Lets in the Most Light?
The maximum aperture of the lens, such as f/1.4.
What Aperture Lets in the Least Light?
The minimum aperture of the lens, such as f/22.